 by: Martin Sagendorf
We’ve all likely encountered the time-consuming effort required to set up an optics demo; all the necessary components are on hand, but they don’t easily work together. The difficulty is obvious: the various components are either ‘loose’ or mounted at differing heights. Thus: wasted and frustrating time ‘shimming’ with books and pads to match the heights of the components.
The solution is simple: choose a height (above bench top) and mount every optical component at the same (optical centerline) height. But, how does one choose a height? Simple: first, determine the optical component with the highest centerline then second, build supports for all the other components – matching this centerline height.
I began with a 100 Watt clear light bulb mounted upon a wooden base – the center of the filament was 4-3/4” above the bench top. I then ensured that everything else I had, or planned to incorporate in demos, could be centered at this height.

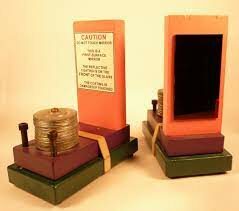
The supports shown in the following illustrations are of ¾” pine – either screwed or glued together. Where required, various combinations of rubber feet and jackscrews provide support and positioning capability. When applicable, stacks of steel washers are incorporated to add stability.
Mirrors (three or four) are frequently required for light and laser reflection demos. Standard mirror material can be used, but first-surface mirrors are better. Two jackscrews are incorporated to provide positioning of the light’s reflected beam.
Both right angle and equilateral prisms are much easier to use when mounted. Three screws provide fine adjustment of the exit light path.

Mounted lenses are clamped, or attached to, a vertical board extending from the base. When the lens centerline is accurately located there is no need for adjusting screws.

Unmounted lenses are held with lens clips attached to a base. The adjusting screws are very useful with this construction.

An adjustable-width slit is easily made with two single-edge razor blades.

Laser pointers and LED flashlights are wonderful, and inexpensive, light sources. Both are very convenient to use once suitably mounted.

Many demonstrations require a projection screen. Two of the smaller size are often required – especially for reflection/refraction demos.

Similar optical component mountings are easily designed and fabricated to mount any optical component – e.g. filters, gratings, and special prism types.
Additional information and many applications of these optical mounting devices are detailed and illustrated in the book Physics Demonstration Apparatus.
Marty Sagendorf is the author of the book Physics Demonstration Apparatus. This amazing book is available through Educational Innovations and includes ideas and construction details, including all equipment necessary, for the creation and use of a wide spectrum of awe inspiring physics demonstrations and laboratory equipment. Included are 48 detailed sections describing hands-on apparatus illustrating mechanical, electrical, acoustical, thermal, optical, gravitational, and magnetic topics. This book also includes sections on tips and hints, materials sources, and reproducible labels.
Marty Sagendorf is the author of the book Physics Demonstration Apparatus.link not working
Sadly, Marty passed away a few years ago, and the book is now out of print. Thanks for alerting me to the link. I’ll update it.