The Energy Ball

December 30, 2009

by:  Sarah Brandt

This uniquely entertaining ball is a fun way to demonstrate open and closed circuits, as well for prompting discussions on conductivity. The following activities are perfect to use in elementary and middle school grades first exploring electricity and circuits.

When both sensors on the ball are touched and a complete circuit is formed, the ball flashes a red light and buzzes.

What makes the energy ball work?

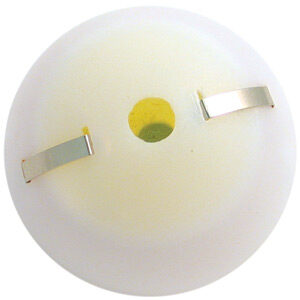
Inside the energy ball is a simple circuit that is completely self-contained. By touching both sensors, the circuit is completed by electrons flowing through your body or another conductive material such as a paper clip. Materials that activate the energy ball are good conductors, meaning they pass electrons easily. Materials that do not activate the energy ball are poor conductors (or insulators), meaning they do not pass electrons easily. Your students will enjoy finding different ways to activate the ball:

One Student: Simply hold the ball so that both sensors are touched or, press one sensor with your hand and the other with a paperclip. Try experimenting with other materials (cardboard, plastic, metal) to see which will activate the ball.

Multiple Students: Using two students, have each student touch a sensor, and then hold hands with one another. See how many students can hold hands and still keep the energy ball buzzing. This is an easy way to demonstrate the difference between open and closed circuits – designate one student to be the “switch.” If the switch releases one or both of the hands they’re holding, the ball will stop flashing, representing an open circuit. Holding hands again will resume flashing, and the circuit will be closed.

An Entire Class: For a fun teaching game, try playing a variation of “Duck, Duck, Goose,” with the energy ball. First, form a circle of hands with the energy ball between two students.  One student should be outside the circle, who will be “it.” This student should then go around the circle, pointing to each person in turn and saying either “closed” or “open.” Once a person has been designated “open,” he or she should break the circuit and try to make it around the circle and complete the circuit before the person who was “it”.

Educational Innovations sells the Energy Ball (SS-30) for $3.95.


Teaching Energy Using Dropper Poppers

December 30, 2009

by: Tami O’Connor

One of the units I enjoyed most as a middle school teacher was the section on energy.  The many awesome hands-on experiments generated such a series of oohs and aahs that it made my already-enjoyable days even more enjoyable!  One of my favorites was a lesson that dealt with the Law of Conservation of Energy.  A consequence of this law is that energy cannot be created, nor can it be destroyed.  (The students would have already explored potential and kinetic energy before the following activity.)

I initiated this lesson reviewing what happens with energy in a closed system.  The students clearly remembered comparing the amount of potential energy to kinetic energy using the example that the height of a roller coaster’s first hill is always greater than the height of any of the remaining hills.  It is, of course, possible to have a little hill followed by a higher hill as long as the roller coaster is going faster at the top of the little hill than the next higher one.  The students were generally able to explain the transfer of energy including heat energy and sound energy in the overall system.

I would then take out a normal playground ball and a meter stick and ask the the students to predict the height the ball would bounce if dropped from a meter off the ground.  Most students accurately predicted that the ball would not bounce as high as the height at which it was initially dropped.  Of course, we would then test our hypothesis.  A few students in each class would always insist that the ball could bounce higher than the height at which it was dropped, so I would invite them to show me how it could happen.  Inevitably, the student would add energy to the system by throwing the ball down to the ground rather than simply dropping it.  This was a great opportunity for discussion and was a topic that we would tap into later in the lesson.

I would then pull out my complete collection of balls that ranged from the hard, less bouncy baseballs to the rubber and highly bouncy super balls and have the students explore on their own.  Though there were noticeable differences in the elasticity of the  balls in my collection, none of them bounced higher than the height at which they were dropped.

My next demonstration utilized a racquetball that I had cut in half… well, actually a little less than half.  I would again ask my students to predict how high the  half-ball would bounce.  The answers varied, but by this time, not one student predicted that it would bounce higher than its drop point.  As before, we tested their hypotheses before moving on to the next step.

Because the racquetball is very flexible, I was able to turn the half-ball inside out thus storing elastic potential energy.  Once again, I asked the students to predict what would happen when I dropped the ball.  Based on their recent experience, they all answered that the half-ball would bounce lower than its drop point.  Of course, because I stored elastic potential energy in this system, once the half-ball hit the ground, it popped right side out and was propelled significantly higher than the point at which it was dropped.  Talk about a discrepant event!

Thank goodness Educational Innovations sells Dropper Poppers.  This product eliminates the time and difficulty of cutting racquetballs in half, not to mention the expense of purchasing racquetballs really intended for use in the court!

Dropper Popper Activities

When this small, “half-ball” is turned inside out and then dropped onto a hard, flat surface, it releases the stored energy and “jumps” higher than the point from which it was released.

EXPLANATION
• Elastic potential energy is energy that is stored as a result of deformation of an elastic object such as a spring or a rubber band.
• Gravitational potential energy is energy that is stored as a result of an object’s position above the ground.

ACTIVITY #1 How High Will a Ball Bounce
Showing your students a regular ball such as a small super ball, basketball, or ping pong ball, survey the class to determine the height at which they predict the ball will bounce if dropped without additional energy. You may be surprised to learn that some students will predict that the ball will bounce higher than the point from which you drop it.

Drop the ball. Students will discover that the ball will never reach the height from which you dropped it. The Law of Conservation of Energy states that energy cannot be created nor destroyed; it can only be transferred as alternate forms of energy. The energy that initially went into the system was transferred out as sound energy and heat energy. The ball will never bounce higher than the initial drop point because the energy that comes out of a system can never exceed the energy that goes in.

Explain to your students that the ball’s energy was stored due to its position above the ground. Because of the force due to gravity, the ball falls down as it is attracted to the earth.

ACTIVITY #2 The Dropper Popper
Show your students the Dropper Popper (POP-100), and ask them to predict the height at which the popper will bounce if you drop it straight down. Drop the popper without turning it inside out and observe the height at which it returns.

Turn the Dropper Popper inside out and explain that by doing work on the popper you are storing energy in it. Have the class predict again the return height of the popper after it is dropped. Drop the popper with the “bulge” pointing upward. When the popper hits the ground the stored elastic energy will be released and will cause the popper to bounce higher than the point from which it was dropped.

ACTIVITY #3 Ping-Pong Ball – Be sure all students wear protective eye wear.
This activity is truly best when each student has his/her own Dropper Popper and a Ping-Pong Ball, (PNG-100). Have the students store energy in the popper by turning it inside out. Then place the ping-pong ball in the “bowl” of the popper. Drop the popper onto a hard surface in such a way that the ping-pong ball remains above the popper and inside of its “bowl”.  The bulge should be on the bottom of the popper so the ping-pong ball fits securely inside.  The height your ping-pong ball will fly will be truly impressive!
• Have students estimate how high the ball travels.
• Change the height at which you drop the popper and determine if the height the ping-pong ball travels is based more on gravitational or elastic potential energy.

An additional demonstration of the Law of Conservation of Momentum and Energy can be shown using the AstroBlaster (SS-150).  This device has several balls threaded on a plastic shaft.  When dropped straight downward onto a hard surface, the top ball can rebound to a height equal to five times the original drop!


The Amazing Drinking Bird

December 1, 2009

by Tami O’Connor

Invented in 1945 by Miles Sullivan, the “drinking bird” has been a favorite of science teachers in every classroom from kindergarten through college. This amazing device is made of two glass bulbs (one representing the head and the other representing the body) joined by a glass tube (representing the neck).  Between the two bulbs, attached to the glass tube, is a metal fulcrum upon which the bird pivots.  The air has been removed from this closed device, and the bottom ball is filled with a colored liquid that has a high vapor pressure (methylene chloride). The rest of the bird’s body and head is filled with the vapor form of methylene chloride.

The demonstration is set up such that a glass, filled to the top with water, is placed in front of the drinking bird. The glass should be the same height as the pivot point of the bird. The bird’s head should be moistened and then the bird should be given a gentle push to begin it oscillating along the pivot point.  Eventually, the bird appears to drink repeatedly, on its own.  So, how does that happen??

The top bulb (head) of the drinking bird is covered with felt. After the felt is moistened with water and the water begins to evaporate, the temperature in the head decreases. This drop in temperature causes some of the vapor inside the head to condense, causing the pressure inside the birds head to decrease. The decrease in pressure in the top bulb causes the liquid from the bottom to be forced upward from the base. As the liquid flows into the top bulb, the bird’s center of gravity moves upward causing the bird to tip forward, dipping its beak into the glass of water.

After the bird tips over and is horizontal, the bottom portion of the glass tube is no longer in the liquid. The glass tube, now 90 degrees to the surface allows the vapor from the bottom to travel to the top until the pressure is equalized.  At the same time, liquid in the column flows back to the bottom bulb. The weight of the bird is now primarily below the pivot point, so the bird returns to a vertical position.

The liquid in the bottom bulb is now exposed to the temperature of the ambient air, which is slightly higher than that of the bird’s head. This cycle continues as long as there is enough water in the glass to moisten the felt on the bird’s head. This cycle gives the appearance of a bird drinking!

SUGGESTED CLASSROOM ACTIVITIES

I) Classroom Discussion

Q. Is this an example of perpetual motion?

A. No. The cycle repeats itself only as long as the water evaporates from the head

Q. What is needed in order for the Drinking Bird to work?

A. A difference in temperature between the head and body.

II) Student Challenges

  1. Observe the operation of the Drinking Bird and explain how it works.
  2. Discover a way to make the Drinking Bird cycle faster.
  3. Predict what will happen if a fan blows air toward the Drinking Bird. Does it make a difference which direction the air blows?
  4. Predict the result of using warmer or cooler water in the glass.
  5. How long will the bird cycle without needing a refill of the water in the open container? Can you find a way of causing the bird to cycle longer?
  6. Is there a difference in the cycle rate on a humid day vs. a dry day? Can the bird be used to determine the relative humidity in the air?
  7. Predict the result of placing a small inverted aquarium over the bird. Does this cause the bird to cycle more or less? (Note: as soon as the water in this closed system reaches its vapor pressure, water from the felt can no longer evaporate and the bird stops.)
  8. Can you attach a thread to the bird so that it does useful work, e.g. lifting a small paper clip?


Follow

Get every new post delivered to your Inbox.

Join 42 other followers

%d bloggers like this: