
by Ted Beyer
The sun is, on average, about 93,000,000 miles (149,668,992 kilometers) away from us. That’s pretty darn far. In fact, if the sun went out right now, we would not know about it for about eight minutes. Not to worry, that’s not going to be a thing to fret about for quite a while—a couple of billion years last time I checked.
That huge (try 109 times as big as Earth) ball of fusion reactor up in our sky is arguably responsible for all of the energy we use on Earth. Not just solar power, but all of it. Fossil fuels (oil, coal, and natural gas) were created from ancient plant and animal matter—which all lived because of the sun.
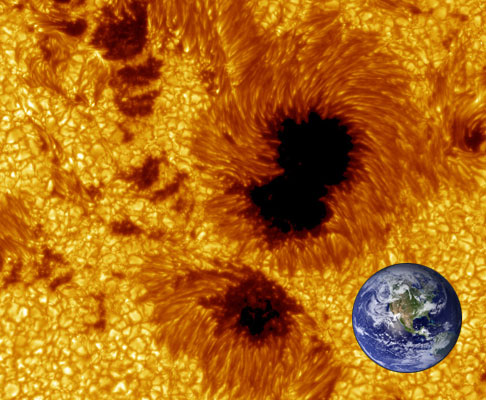
Image source: Stanford Solar Center
Hydropower is only possible because of the water cycle (best look that one up on your own, they won’t let me make these posts too long). Wind power relies on, well, wind—and that is a byproduct of the warming and cooling of the atmosphere—and that’s the sun doing that warming too. Atomic power uses heavy elements like Uranium, which was created in the hearts of suns.
I could go on and on, but I think you get the idea.
Read the rest of this entry »
 by Arthur Murray


 Posted by Donna Giachetti
  Thermal energy—the energy that is generated and measured by heat—is such a wonderful topic that can be approached in many ways. So many questions to explore! What is heat? How does heat travel? What’s the difference between heat and temperature? How do we measure temperature? What are conductors? Insulators? And on and on…
 These days, thermal energy has become—dare we say it?—an even hotter topic than ever! All over the world, researchers are working to discover new ways to store thermal energy, transform it into usable power (i.e., electricity), and more. Although it may be years before some of these discoveries can be put to practical use, it’s exciting see how this area of science is thriving.
 When it comes to thermal energy lessons, we are reminded of the potato chip slogan, “Nobody can eat just one.”