When you think of spaghetti, what comes to mind? Delicious swirls of long pasta coated with your favorite sauce? Or… bridges? Yes, bridges! Creating a spaghetti bridge is a tried-and-true engineering challenge that can be done by students of all ages. The opportunities for variables—and STEM learning—are (nearly) endless!
Designing and building an artificial hand is a great science fair or classroom project. It’s also a vivid, “hands-on” way to get your students thinking about how such robotic limbs are used in society and industry. Whether your students work individually or in teams, this activity is a fantastic experience in creativity, problem solving, STEM, and engineering. Plus, for some students, it may even lead to a future career inspiration!
I’ve wanted a 3D printer for a long time, but I live in a small apartment where space is limited. That’s why I was thrilled when Educational Innovations, the company I work for, started selling 3D pens. They’re much smaller and more affordable than 3D printers, and they don’t require any special computer programs to use.
So, there I was, minding my own business, looking through posts on Twitter with the scienceisfun hashtag, when I was immediately sucked down the rabbit hole of the Tumblewing!!! How is it possible that I had never seen this before? As a former corporate jet pilot and science teacher, this would have been right down my alley. And yet, it was totally new to me!
I’m writing to ensure that this doesn’t happen to you, too! This awesome activity teaches so much authentic science and is a fun activity for almost any age.
Presenting the Tumblewing
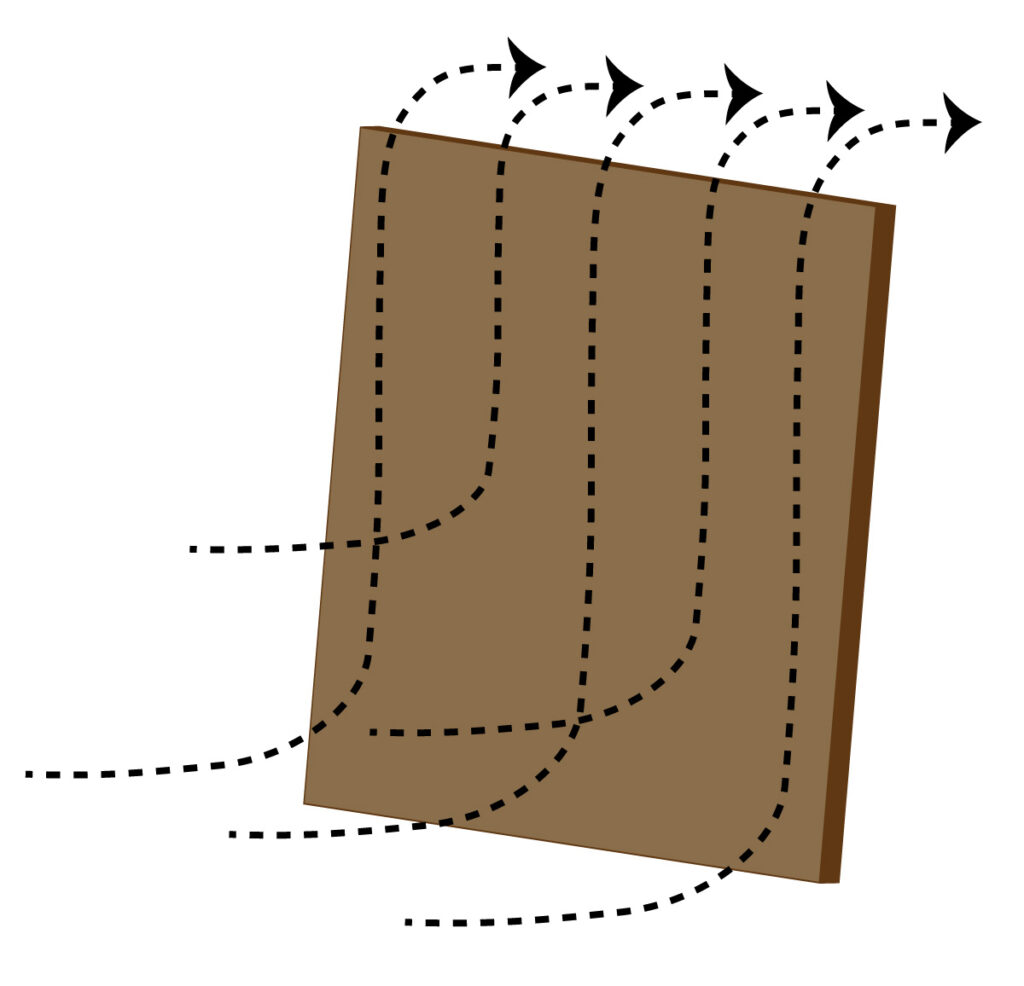
The Tumblewing—also called the Tumbling Wing, or Tumble Wing—is easy to make, and relatively easy to fly. It works when the operator creates a wave of air using a simple piece of cardboard. By moving the cardboard forward, air in front of it is displaced and is pushed out of the way. Some of that displaced air flows over the top edge of the cardboard, and that’s what we’re going to use to fly our Tumblewing. The easiest way to think about this is that the Tumblewing is “surfing” in the airflow.
The pattern we’re using was taken from SciencetoyMaker. They have other awesome ideas on their website including a nifty glider, but right now, we’re just going to discuss the Tumblewing.
Building Your Tumblewing
Click here or on the image below for the pattern you’ll need.
Click on image for printable, full-size PDF.
The idea is to use very light paper. They initially call for phone book paper, but who has a phone book these days? We used newspaper and it worked great, but you can also use tissue paper, which works quite nicely, too.
Using the largest pattern to start, tape the short ends to a piece of newspaper. Cut along the solid lines, but do not cut where the tape is yet. Using a ball point pen, trace along the dashed lines of the pattern, pressing down as you go. This will help to score the newspaper once it comes time to fold.
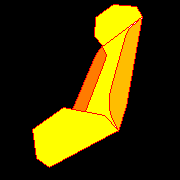
Next, fold the small ends up 90 degrees to create winglets. Then fold along the long lines. One edge folds downward and the other folds upward creating a type of Z in the paper. Notice that the folds taper outward at the ends. It’s important not to fold straight across to the end. Once your pattern has been cut, scored and folded, you can cut the ends where the tape holds the pattern to the newspaper, and you will have your Tumblewing.
Now it’s time to fly! Find an area indoors that is not particularly drafty. Moving air will disrupt your flight. Hold your Tumblewing with the edge that is pointed upward closest to you and release it with a slight downward push on that edge. The Tumblewing will begin to spin in a rolling motion. The wing is actually generating lift by alternatingly flying and stalling as the angle of incidence changes with the spinning motion.
Depending upon the level of your students, this would be a great discussion of Magnus effect. So much great physics, so little time to write it all!
It takes a bit of practice, but once you have it, your Tumblewing will remain flying as long as you continue walking!
Tumblewing Tips:
The larger the cardboard, the easier it is to control.
Keep the cardboard at a steep angle. It’s a common mistake to flatten out the cardboard. But when you do, you are reducing the amount of airflow.
As your Tumblewing starts to fall, simply walk faster to increase airflow and raise it back up.
Keep the Tumblewing near the top edge of the cardboard, but don’t let it flow over the top.
After you get the hang of it, try using one of the smaller patterns. Like a sports car, the smaller the Tumblewing, the more nimble and maneuverable it is.
Engineering plays a prominent role in our lives, whether or not we realize it. Every day, someone creates something we never heard of before: a synthetic ice skating rink… a new form of cardboard that weighs less than a feather… a faster, lighter drone. So it’s no wonder we had a tough time deciding on articles about new engineering feats! Until it dawned on us that the engineers themselves, not their advances, are what really capture our interest.


 Posted by Donna Giachetti
 By Tami G. O’Connor
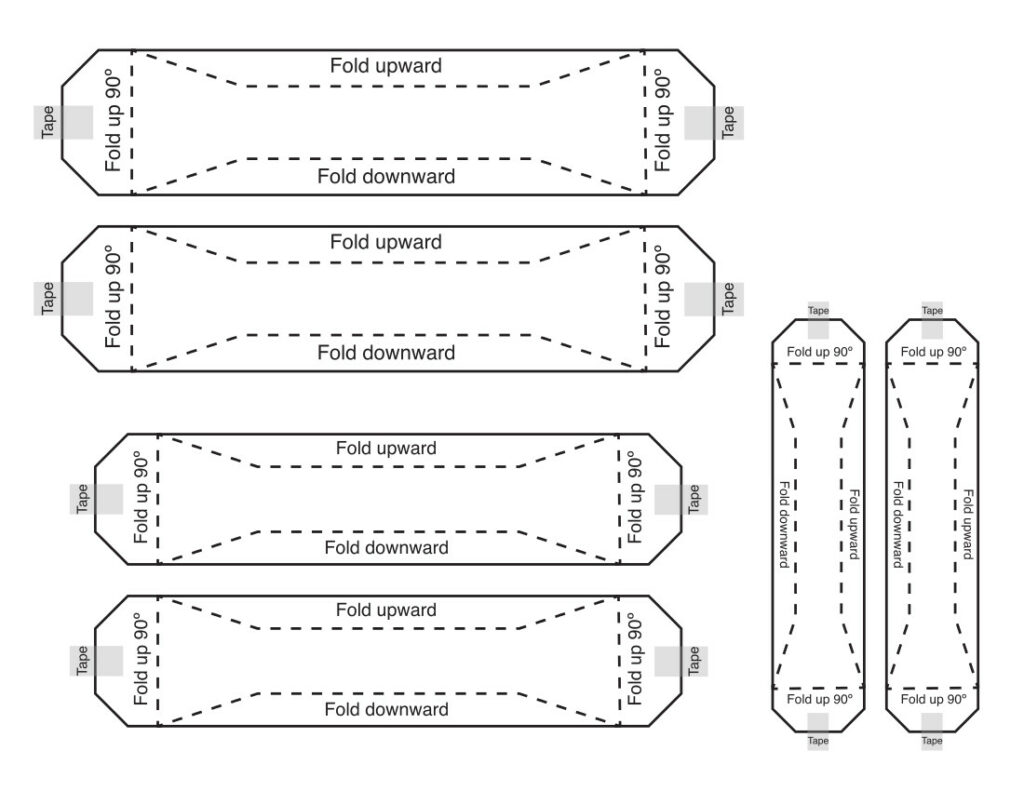


 Engineering plays a prominent role in our lives, whether or not we realize it. Every day, someone creates something we never heard of before: a synthetic ice skating rink… a new form of cardboard that weighs less than a feather… a faster, lighter drone. So it’s no wonder we had a tough time deciding on articles about new engineering feats! Until it dawned on us that the engineers themselves, not their advances, are what really capture our interest.