Phenomenon Of The Disappearing Dot! – Is it Physics, or Math, or Perception?

February 9, 2011

by: Lee Walker and Partnership for Learning.com, LLC

Use a hack saw to cut a 2¼ to 2½  inch length of ¾ inch outside diameter PVC pipe.  The point is for the tube to be three times the length of its diameter. While 2¼ inches is more precise, it is fine to fudge just an extra ¼ inch. Trust me, it’s close enough.  Next put a green dot at one end and a red dot on the other (see photo). I like to drill two small depressions and put the paint in those two shallow holes (don’t drill through).

Set the cylinder down in front of you on a nice smooth surface.  You will need plenty of room as you develop the operational skills, so a reasonably smooth desk or table top should be fine.

Now, place the tip of your index finger on the red dot. It works just fine on the green one, but let’s have the first run match the photographs. If you force down your finger as you pull it slightly back toward you, the cylinder will spin rapidly around a horizontal axis in your direction. You can visualize the action around this axis by imagining the cylinder seen from one end so that it would look like a spinning wheel.

The two drawings below show how the cylinder, viewed from the end, rolls (spins) around a horizontal axis in a direction toward the finger that snaps downward (though sliding away at the same time).  As this is going on, (see the drawing on the left) the end that had the fingertip on it, rotates around a vertical axis in a direction away from the fingertip.

At the same time that the view of the red dot end of the cylinder may be thought of as a wheel spinning around a horizontal axis toward you, the whole cylinder will spin around a vertical axis and skitter away from you. The spin around the vertical axis (seen from above) is shown in this photograph just after my finger popped downward to the table top.

O.K.  Here’s the fun part. As the cylinder settles into a stable, whirling action, you will see three of the red dots appearing. If connected the dots would be at the vertices of a triangle.  Notice that the green dots do not appear at all. Now, try repeating the whole thing but push down on the green dot. When the action is stabilized only three green dots will show up at the vertices of our imaginary triangle.  Pretty neat, isn’t it?

Here are some tips to help investigate what is perhaps going on. When you have spun the cylinder, it has skittered out away from your hand, and settled into a stable, high speed spin, you have probably noticed that there seems to be an illusion of a round, rather ball-shaped zone in the middle of the blurry spin. This illustration (obviously touched up with the red dots) presents a view of that ball region viewed from overhead as the cylinder spins on a smooth table top.

When your cylinder is doing this try observing from the side with your eye down at the level of the table.  One end of the cylinder is in contact with the table during the high speed rotation around the vertical axis and the other end is not in contact with the table’s surface.

The drawing on the left is my attempt to show the cylinder running with one rim in contact with the table and the other end slightly elevated. As this occurs, you can see that the white cylinder is in many places, but the central part of the spin is routinely occupied by white PVC. Does this help you get an idea about that ball-shaped central part?  There may even be some accounting for speed differential if the part in contact with the table makes a longer circuit  than the up end for each spin about the vertical axis. Hmmmm.

Now, this next part is almost as strange as any of the above, and probably no one of the matters I’m going over works alone to present the phenomena that make the spinning cylinder so much fun.

The idea here is that the end with the red dot (the finger just rolled it) is turning around the horizontal axis toward the launch person (see the little blue arrow in the tube), BUT the cylinder at that end is spinning away from the person around the vertical axis (see yellow arrow). The speed of those two actions work against each other (are subtractive).  The red arrow shows that the other end is turning around the horizontal axis toward the person, AND that end is also turning around the vertical axis toward the person (see green arrow). Those two speeds are additive.

Speed of motion and perception must be linked. After all, things that go rapidly past the eye may be blurred or barely visible at all, while things that are stationary or slow moving may be seen quite clearly. Is it a coincidence that one dot is gone and one is seen THREE times when we use a cylinder that is three times as long as its diameter?

Just for fun, here is one more bit.  The circumference of a tube may be found by multiplying its diameter  times pi (3.141 will do for our purposes) .  Now the relationship of the diameter to length may be made quite interesting by thinking, “ Does the tube roll completely around the horizontal axis three times to make one rotation around the vertical axis?” Some experimenting could be very beneficial. Still using a tube of the same diameter with the same placement of red and green dots, what would happen if that tube were only twice as long as the diameter?  How about four times as long?

Enjoy the PHENOMENON OF THE DISAPPEARING DOT! Have fun exploring and using your creativity!  Please contact lee@partnershipforlearning.com if you think you make a breakthrough.  Lots of what I’ve read about this doesn’t really satisfy my curiosity.

Educational Innovations carries the Physics Quest 2010 Kit – Spectra’s Force, which includes the materials for this experiment as well as 3 other experiments.


The Electric Drinking Bird

February 6, 2011

by: Mike Rigsby

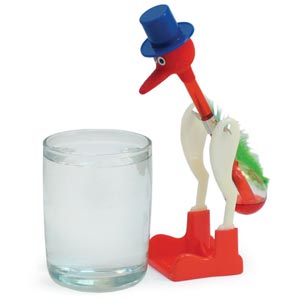
The normal way to operate a drinking bird is to have him dip his head in water.  The water on his felt head evaporates, leaving the head cooler than the bird’s body.  The liquid flowing into the upper bulb (head) changes the center of gravity, causing the bird to tip forward.  Liquid flows back to the bottom bulb and the bird returns to his upright position.  As long as an adequate temperature difference (head cooler than body) remains, the cycle will repeat.

Instead of cooling the head, why not warm the body?  If you place an electrical resistor below the bird’s body and pass current through the resistor, the resistor will get warm.  The warmth will cause the bird to bob.

I used a 12 ohm, 3 watt resistor and applied 5 volts direct current.  This allows 5/12 amp to flow through the resistor for a total power applied of 2 1/12 watts (P=VI;  5 X 5/12).  The resistor gets hot enough to operate the bird, but not so hot that it melts plastic.

What can you do with this?  I built a clock (actually, I used Peltier cells for the heat, but they are $15. each and they cool slowly, leaving a notable shut off lag).

Binary addition of the bobbing female birds (red) left to right yields the hour.  Binary addition of the bobbing male birds (blue) left to right (multiplied by five) yields the minute (to the nearest five minutes).

Complete instructions and an operating video can be found at: http://www.instructables.com/id/Flock-Clock/

This is a good higher level project that involves math (working in binary), electricity (wiring, relays, transistors, a processor), construction (acrylic, drilling, screws), software (programming the Arduino processor) and art (how you arrange the birds, how you make it look).

It takes about 70 seconds for the bird to start bobbing.  He/she will quit bobbing within 60 seconds after removing power from the resistor.  You can use batteries to power the resistor, but the current load will drain the batteries pretty fast.  If you can obtain an electrical on/off signal, you can make a bird bob on command (with a time delay).  The only limit is your imagination!

Mike Rigsby is a licensed (P.E.) electrical engineer. He writes books and creates projects for children. His latest book, Doable Renewables, Chicago Review Press, Oct. 2009 includes 16 Alternative Energy Projects for Young Scientists.  Chapter three is titled “Solar Drinking Bird.”

You can find the Drinking Bird at Educational Innovations http://www.teachersource.com.


Follow

Get every new post delivered to your Inbox.

Join 42 other followers

%d bloggers like this: