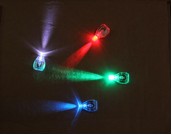
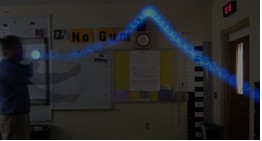
Lights, Camera, Action!

July 21, 2012

by: Bruce Yeany

Micro LEDs and Motion

The tiny LED lights  known as Rave lights have become popular with students at dances and parties.   With the  lights turned down, kids have these lights on their hands or in gloves, and the results are totally awesome when they wave their hands around,.  Watching this phenomenon takes me back to the era of the disco ball and laser light shows.  It became apparent to me that these little lights would be fantastic when incorporated into the study of motion. Using these lights and a digital camera, it would be fairly easy to record the motion of moving objects for closer study.  Rolling, spinning , swinging, falling, projectile motion, etc. can all be captured using a camera and these little lights.

Can you figure out how these were done?

Here are some pictures I have taken over the past year.  Almost all were taken using these small lights.  In some cases the shutter was only open for a fraction of a second and in others it may have been open for several seconds.  Many of the following pictures were made using a laser pointer.

This picture depicts fire being thrown by a small trebuchet.

And of course, it’s also fun to try and write messages….. one small problem is that they appear backwards to the camera.

Bruce Yeany has been teaching physical science in the Annville-Cleona School district for the last 35 years.  He enjoys working with students and  building materials for his classroom.  Over the years he designed several  pieces of classroom science equipment that are produced and sold commercially including the World’s Simplest Motor and the Fountain Connection.   Bruce is also an amateur photographer as is his wife, Mary.  As the middle school yearbook adviser, he is quite used to having a camera around his classroom.  By combining his  hobby in photography and looking for new ways to demonstrate the motion of objects, Bruce has found that using small LED lights and a digital camera can help him freeze the movement of motion and turn it into works of art.


Learning by Degrees: Demonstrating How Temperature Affects Expansion

July 14, 2012

by: Jonathan Smith

I’m a big fan of applied science.  Whenever possible, I like my labs and demos in my Physical Science classes to be as “real-life” as I can make them.  One rich area for science application is the topic of thermal expansion of solids.  Once students understand the underlying principles of why solids expand as they warm, I can choose from a plethora of great examples to teach the concept.

Over the years I have put together a walk-around laboratory experience where students can see the concept of thermal expansion of solids in action.  Of course I have the standard bi-metallic strip and ball and ring demos, but I also include thermostats, a taken apart toaster, and my absolute favorite, the Large Scale Thermal Expansion Apparatus from Educational Innovations.

This demonstration dramatically shows the effect of temperature change on standard household plumbing. The apparatus comes as a set of 4 segments of plastic pipe with easy twist-connectors.  One end of the apparatus fits a standard plastic funnel; the other has a downward turned drain spout.  One of the segments has a “foot” attached to it, which allows the funnel end to be firmly clamped to a table or counter top.  The position of the pipe is then marked at one end with an “O”-ring and a mark on a piece of paper is placed beneath it.  A bucket is placed beneath the drain spout. Students then pour hot water (from tea kettle on a burner) into the funnel at one end of the pipe, which then slowly drains out of the other.   As the water heats the pipe, the pipe expands.  This expansion can easily be measured by comparing the location of the “O”-ring on the pipe with the mark on the paper below it.  My students are always amazed at how much the pipe actually expands.  Running cold water through will, of course, decrease the length of the pipe.

After my students have observed this demo, I like to have them think about the everyday problems this phenomenon may cause, such as creaking or broken pipes.  I also bring to their attention some of the common solutions to these problems, such as expansion joints, specialized piping that allows for expansion and contraction without allowing a pipe to lengthen, and saddle joints, specialized holders for plumbing that allow for the expansion and contraction of the pipe.

Last year I revisited this demo and decided to try and make it even more “user-friendly”.   Instead of the funnel, I connected the funnel end of the pipe to some plastic hosing that I then connected to a faucet from a sink in my room.  I used hose clamps and a laboratory faucet aspirator to make it all work.  As it happened, the drain end of the apparatus now ends nicely at the other end of my counter right over another sink!  Students can now simply run hot or cold water from the sink and watch the expansion.  Even without the other sink as a drain, it would have been easy enough to put a bucket on that end.

A friend of mine who works at a local university and is engaged in the STEM initiative periodically visits elementary schools with basic science apparatus.  He tries to bring in materials that elementary teachers would normally not have access to but demonstrates science content that is age appropriate.  He thought that the basic concept of thermal expansion of solids was a good fit for just such lesson.  We used my modified version of the thermal expansion pipe and were quite successful.  Not only did the students understand the basic concept being taught, but the change in the length pipe was so dramatic they showed complete engagement.


Follow

Get every new post delivered to your Inbox.

Join 42 other followers

%d bloggers like this: