 by: Martin Sagendorf
One Pendulum…
Is interesting, but…
Two Pendulums…
Are much more interesting.
by: Martin Sagendorf
One Pendulum…
Is interesting, but…
Two Pendulums…
Are much more interesting.
 4 Comments |
  College level, energy, experiments, High School level, Middle School level, Physics | Tagged: coupled pendulums, energy, harmonic motion, momentum, pendulums, Physics, resonance |
  Permalink
 Posted by Tami O'Connor
 by: Tami O’Connor
A few months ago I had occasion to conduct two hands-on workshops for elementary and middle school teachers at the NSTA National Convention in San Francisco on behalf of Educational Innovations. One presentation focused on film canister rockets. This is a tried-and-true way to teach Newtown’s First and Third Laws of Motion and also brings to light concepts such as the four forces of flight; thrust, drag, weight, and lift. It also reinforces instruction on 3-D shapes and 2-D plane figures such as circles, cones, cylinders, rectangles, and triangles.
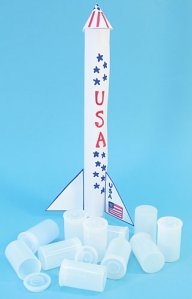 I presented the lesson to the teachers in much the same way I would to my students. The first thing we did was to brainstorm the features all rockets have. After a bit of discussion it was agreed that they all have a nose cone, a cylindrical body, fins, and an engine. I then handed out a paper template imprinted with the pattern of a nose cone and fins, a regular 8½ x 11 sheet of white paper, a piece of goldenrod paper, and a white translucent film canister. Also required are scissors, tape, ¼ piece of an Alka Seltzer tablet, and paper towels.
The only canister that works with this rocket is the type that has the lid that fits snugly inside the canister. The canisters that have a lid that wraps around the outside rim, however, will not allow enough pressure to build up inside the chamber.
The first step in building a film canister rocket is to construct the body of the rocket. The easiest way is to curl the white 8 ½ x 11 paper into a cylindrical shape using the film canister (without the top) as a guide. The paper can be rolled around the film canister and then taped along the edges. The easiest way to recover the film canister is to blow into one end of the rolled cylinder, forcing the canister out the other end. Read the rest of this entry »
3 Comments | Chemistry, Elementary level, energy, experiments, High School level, Middle School level, Physics | Tagged: Alka Seltzer rockets, energy, film canister activities, momentum, parent friendly, PBL, phenomenon based learning, phenomenon-based science, rockets, science, STEM | Permalink
Posted by Tami O'Connor