 by Priscilla Robinson
Spring in the Pacific Northwest comes with a fanfare of germinating seeds, blossoming flowers, and budding trees. As a science educator, I like to jump on Mother Nature’s bandwagon to bring this burst of plant life into my classroom with a variety of biology experiments and activities. What your students see every day can bloom into teachable moments. These learning ideas will help you make the most out of the magic and science of spring.
SPRING SPRIG INVESTIGATION
I like to bring in non-emergent branches or sprigs from trees and shrubs. I have found that willows, forsythia, fruit trees, or spring flowering shrubs work best. (If you don’t have access to similar cuttings, check the floral department at your supermarket.) Place them in a vase of water. Within days, the warmth of the room will transform and force these “barren sticks” into colorful life.
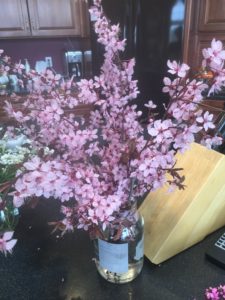
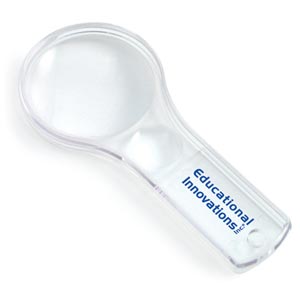
On a Monday, I place a different species of sprig at each table. As a morning warm-up activity, my students are told to “check out and document” their sprig. (Most have never heard word sprig—they really like saying it!) It’s wonderful to see my students turn into investigators, observing minute and massive changes alike. Discussions, sketches, descriptions, and measurements flow authentically. They use Plastic Magnifiers to observe even the tiniest changes.
At the end of the week, each table group delivers a short presentation on their sprig. I like to start this activity on a Monday to get the most out of daily observations. Depending on the species of plant, this activity can take up to two weeks.
GROWING SEEDS, ABOVE AND BELOW
The spring is also a time when dormant seeds wake up and emerge from the ground. This can be observed in garden beds, vacant lots, or along the road as weeds emerge from their winter slumber. Most young learners haven’t learned about the amazing work that goes on underground.
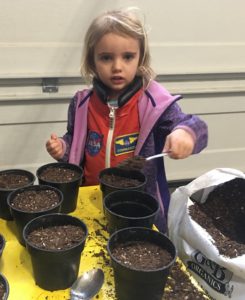
This is a perfect time of year to unlock that magic—by inviting students to observe bean or pea seeds. Especially with younger learners, the larger seeds are easy to handle. I find that a plastic soup spoon or tablespoon allows independence and success instead of working with trowels or large gardening tools.
Below is an easy planting activity which allows students to see what happens above and under the surface of soil. In the past I’ve been successful with bush string beans or sugar snap peas. Both have a good germination record—and as an added bonus, the students have a little veggie starter to take home at the end of the lesson to grow in a pot or garden over the summer.
CUP & WINDOW GARDENING
 Each student gets four bean seeds, a snack-sized Ziploc bag, five cotton balls, an eight-ounce paper cup (or a single serve milk carton rinsed with top cut off), a spoon, a Plastic Magnifier, water, potting soil, a permanent marker, and a paper clip. Since each paper cup holds about a cup of soil, you should plan accordingly depending upon how many students you have.
Students should use the marker to label their bag and cup. Add four beans and 250 mL (½ cup) of water to the cup. Over the course of an hour, they should observe as the seed coat starts to wrinkle and expand. Next, they should place the five cotton balls and one bean in the Ziploc bag. Add five spoonfuls of water and seal the bag.
Next, they should plant the remaining three beans in the paper cup. Remove the seeds from the cup with a spoon and lay them on a paper towel until the cup is ready. Use the spoon to add soil—no more than three-quarters of the cup. Use the spoon to mix the soil with the water that is already in the cup. Tamp soil lightly; this can be done easily with another cup. Place the beans on the damp soil in a triangle shape. Cover seeds with about five more spoonfuls of soil.
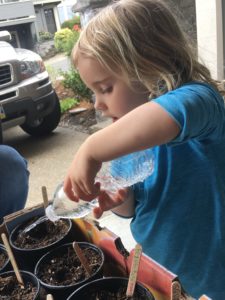
DON’T FORGET TO WATER!
Again, tamp the soil lightly and add another few spoonfuls of water. For very young children, it might be easier to re-purpose a small water bottle for watering. Poke a hole in the cap to reduce and control the flow of water. This one is just the right size for my three-year old granddaughter Katie.
After the seeds have been planted and watered, open and extend one end of the paper clip. The student will use this to poke five little holes along the base of the cup for drainage. Place all the cups on a waterproof tray. (My old cookie sheets are perfect). Add five spoonfuls of water to each cup every other day. A spray bottle with water might also be used to dampen the surface and prevent the seeds from being dislodged. I liked to do it on Monday, Wednesday, and Fridays.
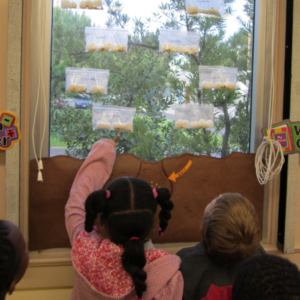
Place the plastic bags on a bulletin board or tape them to a window. It’s especially helpful to place the tray of cups near a window if possible (not absolutely necessary at the early stages).
The beauty of these two activities is that students can observe the underground germination process and then see the emergence of the plant from the soil. I always had the children make a 10-minute observation with sketches and measurements. The hand lens helps them to see small root hairs and other petite structures. Once the beans have emerged, a score of other investigations and studies are possible! Eventually, your students can transplant the plants into container gardens.
POLYMER SEED PLANTING
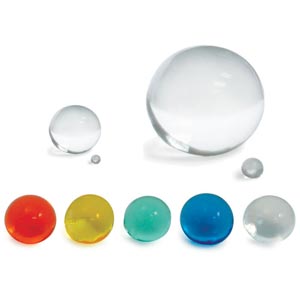 Another favorite experiment with students is germinating small seeds in Growing Spheres. (I prefer the Regular size, GB-710.) These spheres are made from a polymer that loves water; in just a few hours they’ll expand from 2mm to approximately 14mm. As I said earlier, younger children have a hard time with small seeds, so this investigation is probably best for grades four and up.
For this experiment each student needs a soda/water bottle cap (or small Petri dish), three polymer spheres, three radish seeds, a toothpick, permanent marker and water.
Students should use the marker to label the side of their bottle cap. Add three polymers and fill the cap with water. (As time goes by, you can add more water as necessary.)
When fully hydrated, the polymers are an excellent moist medium. Gently poke a hole about 0.5 cm deep into one of the Growing Spheres, and place a radish seed atop the hole. Use the toothpick to press the seed in about halfway. Repeat the process for the other two spheres. Occasionally, the spheres will split, so a few extra hydrated polymers are good to have on hand.
Students should top off the bottle cap with water each day as needed. Radish seeds are reliable and usually emerge in three to five days. I like starting this activity on a Friday, so on Monday we can already see some results. Let the observations begin!
HAIRY DUDE
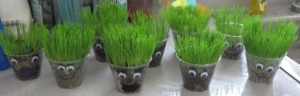 What child would not love growing a Hairy Dude? It’s inexpensive, easy, and most of all, it’s a great deal of fun! For each project you need: an eight-ounce plastic cup, a teaspoon of grass seed, one cup of potting soil, two google eyes, Duco cement glue, permanent markers, and a paper clip.
Glue the google eyes to the side of the cup and, lastly, add a silly expression to your cup with the markers. Follow the planting and care instructions from the first activity above, but this time you’ll only need two spoonfuls of soil to cover the seeds. Place the cups by a sunny window on a tray. Once the grass is well established, they can observe the complex root system through the clear plastic. They can even use scissors to give Hairy Dude a haircut!
TAKE YOUR GROWING… AND LEARNING… FURTHER
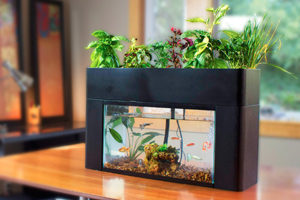 The aim of this article is to inspire you with all the possibilities that can be done with planting inside your classroom. Educational Innovations also has other products that will help you elevate indoor gardening and botanical explorations to a new level. The AquaSprouts Garden guides your classroom instruction with a self-sustaining ecosystem. The system includes a custom-molded garden bed that fits any standard 10-gallon aquarium (not included). This was not a problem for me, as my school had many spare ones in the stock room.
The kit also includes a light bar, a submersible 160-gallon-per-hour air pump, a timer, step-by-step instructions, and a special clay growing medium that keeps your garden healthy and beautiful. It’s an excellent model for the introduction to aquaponics—you feed the fish, the fish provide nutrients for the plants, and the plants clean the water. It’s a class-sized version of the old Bottle Biology demo that I conducted in my seventh grade classroom for years. Most of all, it’s a wonderful year-long way to teach students about sustainable ecosystems.
HYDROPONICS, ANYONE?
T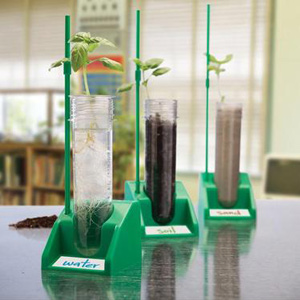 he Hydroponic Plant Lab is another excellent classroom resource. The three oversized test tubes are the perfect size for sprouting seeds and growing seedlings. Each set comes with materials, instructions, and inspiration to explore this popular and viable farming method. I was not surprised to discover that even Costco is into hydroponics. A recent article described how the Butter Crunch Lettuce is more efficiently and cleanly grown with hydroponics. You can also use the test tubes to experiment with the difference in growth mediums: water, soil, sand, polymers… in other words, whatever you like!
Whatever phase of spring you are experiencing in your part of the world, I hope you will capture teachable moments and grow them inside your classroom. They may just spur a budding biologist!