 By Cathy Byrne
Virtually all fourth grade students explore electricity and magnetism. As part of this unit, students are asked to do two things:
1 – Make observations to provide evidence that energy can be transferred from place to place by sound, light, heat, and electric currents (4-PS3-2)
2 – Apply scientific ideas to design, test, and refine a device that converts energy from one form to another (4-PS3-4).
This year, the teachers at my school put a new twist on our electricity and magnetism unit… and the results were amazing!
Light the Bulb
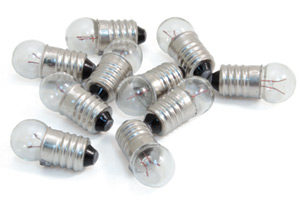 We start the electricity unit by handing out a Miniature Light Bulb, a five-inch long wire, and a D-cell battery to each student. The challenge is simple: can you light the bulb? I give my students at least 15 minutes to explore. I remind them to document ALL their attempts, even the unsuccessful ones. They should include drawings of the circuits they’ve made—including labels.
In order to light the bulb, students need to attach one end of the wire to the negative (or smooth) end of the battery. Then they need to attach the other end of the wire to the bulb by wrapping it around the metal area (where the screw threads are). Finally, they touch the bottom tip of the bulb to the positive (or bumpy) end of the battery.
 Inside the bulb, two wires extend into the base—these create the circuit that lights the bulb. One wire stops at the side of the metal base and the other wire extends into the tip, so be sure all contacts with the bulb base are touching. Explain to your students this is a complete or closed circuit. I make sure they understand that when a circuit is incomplete, it is called an open circuit.
After my students understand these concepts, I pass out Light Bulb Experiment Kits so students can continue to make circuits throughout the rest of the unit. I ask them to think about how they can use these materials to create other circuits. We use these materials to explore parallel and series circuits.
Energy Balls and Energy Tubes
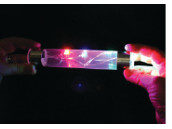 A fun way to help your students understand open and closed circuits is to use the Energy Ball or Energy Tube. I introduce these nifty gadgets to the class by asking one student to hold one side of the ball or tube (making sure they are touching one metal strip). I place my finger on the other metal strip, and then I touch the student’s other hand. When I do, a light flashes and the ball (or tube) buzzes. I then tap the student gently on the nose a few times to create a Morse code effect.
This demonstration is always a hit. Immediately hands shoot up and more students ask to try.
“How many students we can add and still have a closed circuit?” I call up small groups of students and ask them to join hands as we create a larger closed circuit. More students are invited to join the circle until the whole class has joined in. In fact, we’ve even invited other classes to see how many people can be in our circuit. How many students can you include in your closed circuit?
This is a great time to talk about what is happening and introduce the terms conductors and insulators. The human body is a conductor of electricity because our bodies are 70% water and our body cells contain various ions like sodium, potassium, and chloride—all of which are able to conduct electricity. Our exploration continues as students investigate other conductors and insulators.
Sellin’ It
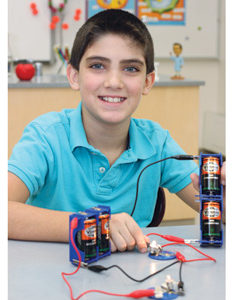
Near the conclusion of our electricity and magnetism unit, I show my students some infomercials. We talk about the purpose of infomercials and students share what they think makes them effective. Students are asked to think about a real-world problem that they could solve with electricity or magnetism. I tell them that they are going to create a prototype and then “sell it” in their own infomercial!
Students can choose to work in small groups, pairs, or individually. The first day I ask students to brainstorm real-life problems and possible solutions. I encourage students to come up with more than one possible solution for their problem and consider the materials they have available before deciding on a final project. I provide students with a variety of materials including:
- batteries
- battery holders
- wires
- magnets
- light bulbs
- light bulb holders
- hand generators
- solar cells
- switches
- bells
- motors
- fans
- and of course tape, scissors, glue, duct tape, etc.
I also share items from my recycling bin that I been saving all year: cardboard tubes, shoe boxes, take-out containers, Styrofoam trays, bottle caps, cereal boxes, etc.
Lend a Hand
Sometimes students need a little help coming up with a real-world problem, so you may need to suggest a few ideas. Last year our community had a power failure the week before we did this activity, so having no electricity at school became a real-world problem that several groups tackled.
Here are some other problems my students came up with:
- waking up in time for school
- reading in bed after mom says, “Lights out”
- preventing a sibling from sneaking into your room and touching your stuff
- finding relief from getting too hot when you are playing outdoors
- reheating leftover pizza
Next I ask students to brainstorm possible solutions to their problems, such as:
- alarm clock
- clip-on light
- door alarm
- portable fan
- solar oven
The goal of this project is for students to apply scientific ideas in order to design, test, and refine a device that will convert energy from one form to another. In the examples above, electric battery energy is transferred into motion as a fan spins, solar energy is transferred into sound as an alarm buzzes, or movement energy from the hand generator is converted into light and heat. You may need to guide your students to help them understand the types of energy conversion their devise will produce.
Before students start to build, they need to create an initial design of their device with an explanation for why it is designed the way it is and how it will solve the problem they have identified. Students then build their prototype, test their design, gather data, and refine their design in order to draw conclusions about its effectiveness.
As students complete building their prototypes, they create scripts to help explain their invention and film their infomercials. Most of the infomercials we made were about three minutes long. Students started with a hook:
Have you struggled with getting up in the morning?
Do you hate it when your brother sneaks into your room?
Does the sun bother you when you are outside playing baseball?
Is tying up your boat a problem?
Then they presented their revolutionary solution and demonstrate their product, explain how it works, and wrap up their infomercial by telling viewers how they can get theirs.
Our new Solar Alarm Clock will have you up with the sun! Our Door Alarm will let you know whenever someone enters your room! The hands-free Hat Fan creates a steady breeze to keep you cool! The Electromagnetic Docking System will let you secure your boat with the flick of a switch!
On the last day of our electricity unit, we invite some guests (parents, the principal, students from other classes) into our classroom. We pass out snacks and kick back to watch one another’s infomercials. It is a fun way to go public with our learning. Students love seeing their work on the big screen and answering questions about their product.
Cathy Byrne is an elementary school STEM coach at the STEM Magnet School in Greenwich, Connecticut. She has taught grades 1 – 5 for 26 years and now works with teachers to support their implementation of inquiry and STEM lessons. She also teaches STEM classes to grades 3-5, after-school K-5 STEM classes, and is currently helping to create a Tinkering Studio for her school community.