 The Chinese Spouting Bowl
by Ted Beyer
When we are at one of the many educational shows we attend each year, teachers often ask what our favorite products are. I always point at two items – our eddy current materials (here’s that post!) and The Chinese Spouting Bowl. When I mention the bowl, invariably I hear – “yeah, I have seen that in the catalog – does it really work?” The simple answer is yes, yes it does. It not only works, it is amazing to see work, not that hard to make work, and most importantly, it can also be a powerful teaching tool. In fact, the Chinese Spouting Bowl is an ancient and fascinating object that can bring many different science scientific principals into the classroom in an unexpected way.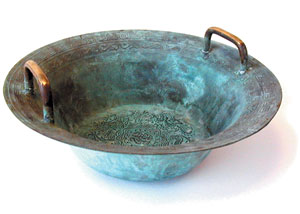
First, some history —
The Chinese Spouting Bowl first appeared in the Han Dynasty (202 BC – AD 9). Often, the bowls are decorated with four ‘Han’ fish that can be seen in the bottom of the basin spraying streams of water up the sides of the bowl. Other motifs include leaping dolphins, sprays of water or dragons. It is said that originally, the bowl was a plaything for the nobles, gifted scholars and socialites in the court of the emperor. It was believed to foster happiness, prolong life and increase strength. The modern reproductions that Educational Innovations offers are still largely hand made in the traditional fashion.
So — how does the Spouting Bowl work?
In essence, the bowl works in the same way you can make a wine glass ring by running your wet finger around the top edge of the glass.
The science behind these work is a bit complex, but comes down to what is know as the “slip-stick phenomena.” Simply stated, this is caused by two surfaces alternating between sliding over each other, and sticking to each other. Of course there is a corresponding change in the force of friction – if the force applied is greater than the static friction between the two objects, there is a sudden jump in the velocity of the movement. This motion is once again overcome by the static friction force, and the objects stick once more.
This ‘stuttering’ moment creates vibrations within the object.
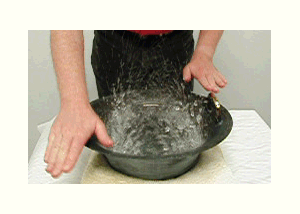
Your hands create vibrations in the handles from the repeated quick bursts of adhesion of your wet skin to the brass – slip and stick on a grand scale. Obviously, oils or any other lubricant will reduce this adhesion to the point where your hands just slide over the surface with no adhesion at all.
Your first time using the bowl, use the large flat area of your palm to rub the handles, and soon you should be able to see four nodes and antinodes appear in the water (four areas of relative calm, and four areas with significant ripples). This will create a relatively low tone.
Practice getting this tone many times. As you get better, the standing waves will collide with more force, and the water will spout! Then adjust your hands to create a higher frequency. This adjustment will be different for each person because not only are each of the bowls unique, but so are the people using them. This higher frequency you get may have anywhere from six nodes to twelve nodes. It depends on the bowl and the person. Your hands might find it easier to get the higher frequency by using your two forefingers to rub back and forth. Or your hands might find it easier to rub the handles side to side quickly using the part of your hand right below your fingers. Remember, that you will never be able to convert a low tone into a higher tone, so if you see or hear the 4 node tone, stop, damp out the vibrations, and start again. Some people can pick this up quickly; others need a bit more practice. Find what works for you and your bowl and practice it so that you can demonstrate it to your students quickly and easily.
“So – this thing looks all splashy and cool, but what is the point in a classroom?” you ask…
How about we make students understand that there are more waves per time period at higher frequencies than at lower frequencies? There are lots of other things we can do, but I like this one – it’s pretty cool.
Before we move on to the lesson, let’s establish a few things:
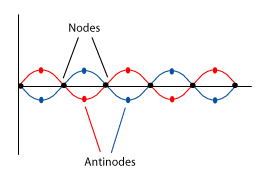
As we have already discovered, when looking at the disturbance in the water you can observe, at the base frequency, 4 nodes and 4 anti-nodes. Moving clockwise in terms of a standard sine wave graph, the first anti-node would be the top of the first wave, and the second anti-node the bottom of the same wave. However, for the sake of this lesson, let’s make an agreement: let’s pretend that each visible anti-node is the top of a wave, and is accompanied by an ‘invisible’ bottom half of that same wave that exists outside the bowl.
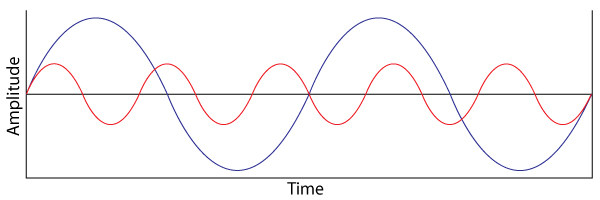
We have all seen the universal standard graph of a sine wave. Beginning with time on the left, and end of time on the right, a center line running horizontally showing zero motion, and the sine wave undulating above and below that center line. The distance horizontally from the highest peak to the lowest valley is the frequency (I remember that by thinking of how FREQUENTLY does the wave cross that center line in a given time period). The distance vertically from the highest peak to the lowest valley being amplitude (that would be the volume, or how loud things are – I remember that one by thinking ALTITUDE = AMPLITUDE).
Now then —
Explain to students what the Chinese Spouting Bowl will do and explain to them what they will be looking for. Tell them about the nodes and the anti-nodes and that the nodes are the peaks on a graph and the anti-nodes are the points at which nothing is happening and will appear halfway between the nodes. It will make it easier for them if you have a sine graph up on the board to show the points you are discussing.
Once you have that all set in their minds, start rubbing the bowl so you can show the four nodes and anti-nodes. Have the students gather around so they can all see the nodes and anti-nodes in the water (or use a camera). Ask them to go back to their seats and then imagine what would happen if you took the bowl and stretched it out until it was straight. Tell them to imagine the diameter of the bowl stretched out as one period of time, such as one second. Ask them to sketch out what the vibrations of the water would look like on the graph. Depending on the grade level, you might have to sketch this out with them to help them understand what you are asking of them. Especially helpful would be to have graph paper with the center line, and start and finish points already filled in for them.
Now generate the higher frequency with your bowl and have your students count the nodes and anti-nodes. Ask them to sketch the graph again as if the bowl were stretched out but tell them to make sure to keep the length of the entire graph the same as the one before because the bowl hasn’t changed at all. Give them an idea of what the graph should look like.
Now ask them which graph had the lower sound and which one had the higher sound? They should immediately “get” what is going one – after all, they have seen it – AND they have heard it. More nodes = higher tone. All of a sudden it some make sense! They can see it and they can hear it, so they should easily be able to grasp it and explain the graph.
As I said, you can do lots more with your bowl. Here are just a few ideas:
- Do the four nodes. Have students touch the edge of the bowl at a point of the least disturbance (a node) in the water and a point of maximum disturbance (an anti-node) in the water. What do you feel? Why?
- Have students firmly grasp the edge of the bowl at the same two points (one at a time) using a thumb on top and two fingers on the bottom. What happens? Are they different? Why?
- Suspend a ping-pong ball using some fishing line so that it touches the edge of the bowl at an anti-node. What happens?
The Spouting Bowl is a vastly underrated teaching tool! I hope you have the opportunity to come see us play it at a science show sometime soon – I think you will be as amazed as I was the first time I saw it.