 by: Martin Sagendorf
On a Bright Day:
A great deal of energy falls on the Earth’s surface – roughly 1 kW per square meter. This is about 0.6 Watt per square inch. This doesn’t sound like much energy, but suppose we collect and concentrate 63 square inches of this sunlight? These 63 square inches would collect about 38 Watts of energy. This doesn’t sound like much, but…
Suppose We Could Then:
Concentrate these 38 Watts into an area of only 1/8 of a square inch? This is exactly what we can do with an inexpensive plastic Fresnel lens. We’ll focus the sunlight into an area 3/8” in diameter – this is the equivalent of 300 Watts per square inch! With this energy level, we can easily ignite a piece of wood, boil some water, and even melt a penny.
A Suitable Device:
Is described in the book, Physics Demonstration Apparatus and in the blog The Sun’s Energy.
Now we’re going to describe how to build a much simpler version that works just as well – one that uses a very inexpensive Fresnel lens and is very easy to construct.
Much Simpler:
In fact, this version so simple and inexpensive that many setups can be made for little more than the cost of the Fresnel lenses. For each setup:
A lens board:
- A plastic Fresnel lens (7-1/8” x 10-1/4”)
- Two pieces of 11” x 14” corrugated cardboard
- Some masking tape
For the demonstrations shown:
- Four spring-type clothes pins
- A large paper clip
- A penny (minted after 1981)
- A (large-tipped) permanent black marker
- A ½” copper pipe cap
- Detergent
- Water (to fill the pipe cap)
The Concentrating Sunlight Lens Construction:
It is absolutely necessary that the Fresnel lens be held ‘plane’ so that it may achieve a good focus. To achieve this, two pieces of corrugated cardboard are used to mount the lens – their corrugations are placed at right angles.
- Ensuring that the hole outline in each piece is correctly oriented, cut an opening in each which is ½” smaller than the lens – use a single-edge razor blade or a hobby knife. When laminated, this pair will be much stiffer (and planer) than a single piece of cardboard or two pieces with parallel corrugations.
- Place the two cardboard pieces together and, using masking tape, tape the hole edges and the outer edges together
- Place the lens over the opening and tape it over the opening with the grooved face downward (to protect the face from scratches)
- A NOTE: It’s a strange property of corrugated cardboard: it always seems to warp – to counteract this I store these lenses under some heavy books
Of Absorbance:
The ‘blacker’ the absorbing surface – the greater the amount of energy absorbed.
Of Thermal Conductivity:
For our purposes, less is better – the object to be heated should be supported such that there is minimal energy loss via the supporting device – hence the use of ‘low-contact-area’ paperclips for holding a penny or a piece of wood supporting a pipe cap.
Igniting Wood:
It really isn’t necessary to make a black spot on wood – it will quickly ignite. For even faster ignition, use a black marker to make a 3/8” diameter ‘spot’ at the focus location.
A Simple ‘Water Holder’:
We’ll use a ½” copper pipe cap (sometimes called a ‘tube cap’). However, because the copper is highly reflective, we need to make its surface much darker – the darker the better.
Clean the pipe cap with strong detergent (to remove any residual oil). Dry it well. Use the black marker to ‘color’ both the inside and outside surfaces.
Remember to mention to the students that so long as the pipe cap contains water, its temperature cannot exceed the boiling point of water. But, if the water is boiled off, the cap’s temperature will rise to that which the concentrated sunlight can produce – allowing this to occur may ‘burn’ the cap’s coating – to reuse the cap simply blacken it again.
A Simple ‘Penny Holder’:
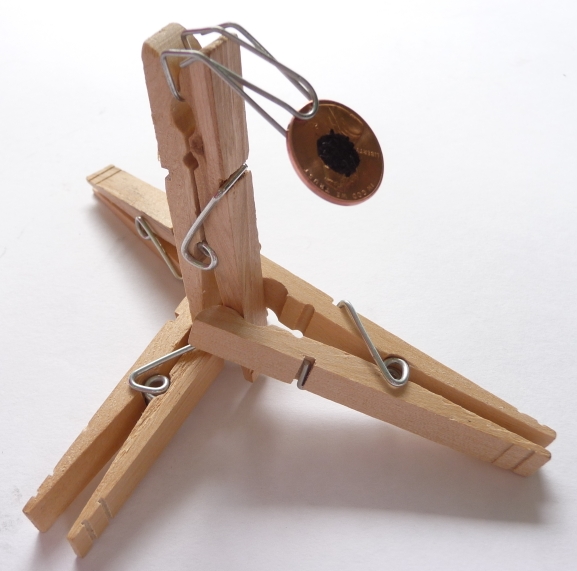
Using the black marker, make a (very black) ‘spot’ about 3/8” in diameter in the center of the penny’s face. Bend (using pliers) the paperclip as shown – note the small ‘hook’ at the end of the inner part of the paperclip, this prevents the penny from ‘squeezing’ out.

In Use:
Good results require a bright & clear sky – even a slight haze will dramatically decrease the sun’s available energy. Interestingly enough, even the sunlight on a very clear day in the winter will provide sufficient energy for good demonstrations – however, the noonday ‘higher sun’ in the summer months is far better.
Place the object to be heated on the ground. Two students holding opposite sides of the lens board can position the board for direction and focus. The ‘altitude’ of the sun will determine the positioning (height and angle) of the lens and the positioning of the object to be heated. A support for the bottom edge of the lens board will enhance stability (e.g. a box or a stack of books). It is necessary to focus and maintain the focus for a continuous period (sometimes up to 60 seconds) to achieve the necessary heating time.
The lens must be orientated perpendicular to the sun’s rays, with the object to be heated located directly in-line behind the lens. A typical Fresnel lens of this type has a focal length of 10” to 11”. The ‘ruled’ side of the lens must face the sun.
Some Examples:
Focus the sunlight into the smallest spot possible (1/4” – 3/8” dia.).

The sunlight need only be focused such that the whole spot area is smaller than the black surfaces of pipe cap.

Construct the ‘penny holder’ such that the penny is held perpendicular to the light beam. Focus the sunlight into the smallest spot possible (1/4” – 3/8” dia.).

Some Obvious Cautions when Concentrating Sunlight:
This lens will produce temperatures in excess of 600 degrees F (300 degrees C)! Caution students that they must not place their hands (or anything else) within the concentrated sunlight. It is highly recommended that everyone wear (U-V resistant) sunglasses if they are likely to look directly at the object being irradiated (there can be a great deal of reflected U-V energy). Advise students not to handle any object that has been heated until it is cooled sufficiently. For a penny, this can take several minutes.
NEVER LOOK AT THE SUN THROUGH THE LENS ! ! !
These Are:
Great demonstrations for any General Science, Earth Science, Physical Science, or Physics class. They truly do illustrate the energy in everyday sunlight – energy that we all know is ever-present, but little appreciate its magnitude until we actually witness its concentrated power. Or:
Truly memorable Solar Energy Labs can be created wherein each group of students is supplied with:
- A lens board (pre-made)
- Several clothespins
- Several paperclips
- A piece of wood (like, 4” x 4” square)
- A ½” copper pipe cap (previously cleaned)
- A U. S. penny (1982 or after)
- A large-tipped permanent black marker
- A few mL of water
- A pair of pliers (for bending paperclips)
- Sunglasses or darkened glass/plastic (U-V rated)
The assignments:
- Discover how quickly how some materials – like wood – can be quickly ignited (time required?)
- Construct a support for a penny and melt a penny (time required?)
- Boil a small quantity of water (time required?)
Some follow-up questions:
- “Why does the wood ignite so quickly?”
- “Why does it take a longer time for the penny to melt (than for the wood to ignite)?”
- “Why does the water boil so quickly?”
- “Why is it (sometimes) necessary to have a black surface on the material to be heated by the sunlight?”
A Pre-Lab:
Might include discussions about:
- Energy (the ability to do work)
- Solar energy
- Energy conversions (light to thermal)
- Absorption/Reflectance
- Specific Heat
- Lenses (common and Fresnel)
And possibly:
- Each group constructs their own lens board
Notes:
- Remember, the actual exercises must be done on a day when the sunlight is ‘really bright’ – anything less simply will not provide the energy necessary.
- Always store a Fresnel lens away from direct sunlight – under the correct circumstances it can start a fire.
- ‘Dusting-off’ the Fresnel must be done with compressed air – wiping with paper or cloth will scrape material into the grooves and diminish its optical quality.
Guidelines for building the Atomic Penny Vaporizer are detailed in the book Physics Demonstration Apparatus. This amazing book is available through Educational Innovations and includes ideas and construction details, including all equipment necessary, for the creation and use of a wide spectrum of awe inspiring physics demonstrations and laboratory equipment. Included are 48 detailed sections describing hands-on apparatus illustrating mechanical, electrical, acoustical, thermal, optical, gravitational, and magnetic topics. This book also includes sections on tips and hints, materials sources, and reproducible labels.

neat i have a10 by 14 or 11 inch lenns hard plastic it burns instantly
Dear Ms
Can You make a setup to wide spread sunlight in such a way that it raises the temperature around 120-C not around 600-C.?
Best Regards
Hello Dr. Goel,
I am attaching the answer from Marty Sangendorf, the author of this post.
The easiest way to lower the temperature is to simply reduce the area of the Fresnel lens. A piece of opaque material (cardboard) with an opening centered on the lens center will do this. You’ll have to experiment to find the correct diameter opening for the day’s sunlight level.
I hope this helps!
~Tami
Educational Innovations
Yes just change the distance between material to be heated & lens. The focal point will spread. Closer by 3-4″ should accomplish what your looking for. No need to reduce surface area of lens, that would just decrease overall thermal output.
Hello …
Not sure how you came up with the 300 Watt. If the concentration ration is the lens area/concentration area = 63 square inch / (1/8) square inch and the total concentrated power is the 38 watt x concentration ration that does not add to 300 watt. I only get 300 watt if I multiply (1/8)(36)(38), which does not make sense to me. Could you please help me understand your process?
Thank you
Hello can someone show me how to calculate the KW power of a Fresnel lens of 1 m² withe sun irradiation of 1kW/m²
Kind regards
Ghysels Claude
I would like to do this as a science demo, but where I live its really rainy and cloudy. Can I substitute a lamp with an incandescent bulb or heat bulb? I don’t need to melt a penny, just popping a black balloon would be impressive enough. Thanks!