 by: Martin Sagendorf
An Odd Name: They’re named for the German physicist Ernest Chladni who popularized them in the mid-1700s. His name is pronounced: kläd’nêz.
Chladni Plates are: Thin plates (sprinkled with fine particles) vibrated perpendicular to their plane.
How? – Then and Now: Long ago Chladni used a cello bow to excite the edge of a thin metal or wooden plate. Today, we can use an oscillator, amplifier, and an electro-mechanical oscillator. We have a great advantage, we can easily vary the frequency of excitation thereby providing a whole vista of experimentation.
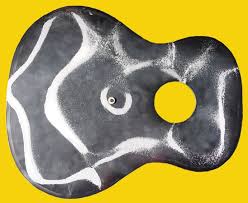
A 17 in. x 14 in. Chladni Plate in guitar shape at 200 Hz
 The same piece at 235 Hz. There are many more resonances at higher frequencies

What the Chladni Plates do:
Vibrate (in multiple modes) as functions of:
- plane dimensions
- mass per area of the planes
- excitation frequencies
- locations of excitation
Why do This?:
To study the resonance conditions of the (usually) wooden parts of stringed instruments; e.g. violins, oboes and guitars – although similar studies are applied to pianos, drums, cymbals, and bells.
In Practice:
- The plate under study is (often) vibrated (and supported) at its center of gravity
- Salt is sprinkled on the plate’s surface
- Starting with the vibration at a low frequency (e.g. 100 Hz), slowly increase the frequency until a first resonance is obtained – adjust the amplitude of vibration as necessary to achieve salt migration – you should be able to hear the sound – too much amplitude will cause excessive motion of the salt (and poor patterns)
- Successive resonances are observed with the salt moving from pattern to pattern
- ‘Rock’ the frequency very slowly around a resonance point to achieve exactly the resonance frequency (sharp salt lines)
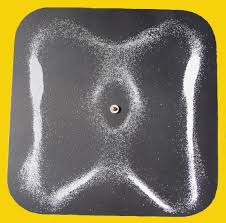
12” Square Chladni Plate
At 258 Hz.

- Increasing the driving frequency causes the salt to move into the next higher resonance patterns
At 495 Hz

At 870 Hz

At 1259 Hz

- All plate shapes will exhibit multiple resonance conditions
- Some salt will vibrate off the plate. Use a large shaker to add salt as necessary.
Why the Patterns?:
When the Chladni Plates achieve a resonance condition, ‘standing waves’ are created. This is, in fact, analogous to the similar effect in a vibrating string – except this is in two dimensions.
At resonance, the plate’s anti-nodes will be oscillating up-and-down energizing the salt – the salt will (naturally) move towards a lower energy level. The lower level is a node. That’s where the salt will collect (and remain), creating the lines we see. These are the lower energy (non-vibrating) zones.
The ‘Exciter’:
Any commercially available electro-mechanical unit will work well for this demonstration. However, these units are expensive (>$200). An alternative is to build-your-own as illustrated in the Physics Demonstration Apparatus Book. Its cost is a (discarded) mid-range audio speaker, a wooden box and a construction, coupling the speaker’s cone to a vertical rod. Building the unit, as shown in the book, does require some machined metal parts and a little ingenuity can simplify the unit’s construction (wooden pieces in place of aluminum pieces). However, be mindful that the air’s varying humidity will affect the ‘fits’ of wooden components – that’s why the book’s design utilizes aluminum for the top plate and the rod guide.
The Home-Made Oscillator:
The Plates:
Although wood and cardboard will work, both are susceptible to warping. For this reason, I make plates of very thin steel and aluminum – typically about 1/64” (0.0156”) thick. My sources are the (discarded) side panels of tower computers and the covers of (discarded) microwave ovens. Don’t attempt to use sheet metal shears to cut plates from these. Instead, use a very fine (at least 24 teeth-per-inch) band saw blade or a similarly fine-tooth saber saw blade. These methods yield a flat surface at the periphery of the plate. The demonstrations do require a very flat surface to produce acceptable resonance patterns. Be sure to file the edges free of burrs.
Plates in the range of 12 inches (square/round) work quite well.
Drill a hole at the plate’s center-of-gravity. Use a banana plug to connect the plate to the vibrating rod.
Some Additional Patterns:
Two resonance patterns of a 12 in. diameter round disk:
At 175 Hz
At 240 Hz

Two resonance patterns of a 12 in. square with rounded corners:
At 180 Hz

At 290 Hz

In the Classroom:
This is a wonderful real-time demonstration. And, even better, the plates can be photographed at their resonance frequencies, to be compiled into labs, reports, science projects, as either hard-copy or as PowerPoint presentations.
Endless possible plate shapes provide a great variety of investigations – different sizes of square, rectangular, round, and musical instrument shapes – enough explorations to keep several groups of students truly engaged in fascinating exercises.
Marty Sagendorf is the author of the book Physics Demonstration Apparatus. This amazing book is available through Educational Innovations and includes ideas and construction details, including all equipment necessary, for the creation and use of a wide spectrum of awe inspiring physics demonstrations and laboratory equipment. Included are 48 detailed sections describing hands-on apparatus illustrating mechanical, electrical, acoustical, thermal, optical, gravitational, and magnetic topics. This book also includes sections on tips and hints, materials sources, and reproducible labels.

Hi Cole,
It’s my pleasure. This demo is amongst the neatest I’ve ever done – well worth making-up the apparatus – everyone loves it – I was (and still) totally ‘wowed’ with it. Thanks for saying ‘thanks’.
Marty
I see that you wrote this article a while back but I am just now getting to it. I am working on a an art project and wold like to burn the patterns created into a sheet of steel (gun powder instead of salt). Getting thin uniform sheets of steel is no problem at all and I have a lot of experience working with metal (www.christophercrane.com) but I was curious do you think I could do this with a sheet of steel 4 feet by 4 feet? And if so how would I have to modify the standard setup… what kind of driver do you think I should use? Thanks for any insight you might have! Thanks- chris
Hi Chris,
An interesting idea for sure!… really neat.
I hadn’t considered driving as large an object as you suggest, but I believe it’s quite possible with the proper approach.
There are three components to the demo as it is illustrated: an audio frequency oscillator, an audio amplifier, and a speaker modified to couple vibrations to a flat plate.
I built the speaker assembly because I couldn’t afford to buy a commercial vibrating unit.
I have read that a low frequency speaker (a ‘woofer’ – say, at least 8″ in diameter) will, even without actual contact, excite a plate supported horizontally above it. Certainly this is not the most efficient method of coupling the vibration energy, but it may work for what you wish to do.
I would suggest using the thinnest steel you can obtain – like 0.032 inch. (Aluminum has a lot less density – it would be a lot easier to excite.) Note that I used steel only because it was free at our town dump.
Whether mechanically driven, or acoustically driven (speaker not connected), you’ll need to support the plate to keep it flat (horizontal). I’ve used both solid and resilient (foam rubber topped) supports. I would suggest you experiment with various types to find the best situations.
I’d be most interested to know how you’re doing. And, please, if you have any questions or if I can help in any way, contact me. This is fun stuff!
Excellent thanks! Do you think I might benefit from pre rolling the sheets …. basically bending them slightly in a ( shaped form so that the sheet’s gravity pulls it flat when suspended in the middle by the driver bar?
Hi, I would like to do this but not sure where I can go d the metal sheets from. Any advice please? Many thanks, Regina.
Hi Regina,
What you’ll need is thin (0.032″ or slightly thinner) sheet metal – aluminum or steel: Steel is preferred only because it’s far more durable than aluminum (kids bending it). You can get it from a hardware store or home improvement store – usually 36″ square pieces – preferable to cut to size with a very fine (18 or 20 tooth-per-inch) blade in a saber or band saw.
I prefer the price of materials from my local recycling center (dump) – computer cases and microwave oven cases – if painted with texture paint, use the inside (smooth) side up. Also, an HVAC (furnace/air conditioning) company that makes duct work could certainly fabricate them. The finished sheets need to be really flat – that’s why tin snips aren’t good… they leave the edges wavy.
Hope that helps!
Remember, we’re dealing with a two-dimensional sheet. Rolling in just one direction will result in a ‘U-Shaped’ sheet – And rolling again at right angles just won’t work. In any case, I think it would be most trying to balance a four-foot-square sheet on a single point. I really suggest a flat sheet, driven in the center, using four or more ‘springy’ supports radially arranged (i.e. not necessarily out at the edges) – experimentation is the word here.