
By Jared Hottenstein
Construction paper… Scissors… Colored markers… Glue sticks… These simple materials can unlock a world of science for kids to explore. These days, STEM initiatives are already shaping how kids understand science. But now, with the educational shift to online learning, we’re looking at the perfect opportunity to add “Arts” to STEM. In other words, full STEAM ahead!
“A” Is for Art
Adding the “Arts” to Science, Technology, Engineering, and Math is a guaranteed way to make online learning more hands-on and engaging. Let’s face it: many kids are spending an abundance of time staring at a screen. Encouraging our students to break out some art supplies in the name of science is a great way to get them to unplug the technology and go old school. Even older students can’t deny that there’s something satisfying about a squeaky marker gliding over paper.
So where do we start? If we want to turn STEM into STEAM, we have to understand what we mean when we say the “arts.” Arts encompass social studies, history, creative writing, physical arts, fine arts, visual arts, and music. In the world of the elementary classroom, it’s easiest to think of the “arts” as arts and crafts. In a STEAM science classroom, kid are encouraged to design, create, or build something that illustrates a scientific concept—but with an artistic flair.
Ready-to-Go STEAM Materials
Educational Innovations has some great products for artistic inspiration. Scooter Art and Chromatography Filter Paper are two examples of science materials that give kids the chance to design some vivid, colorful visual art.
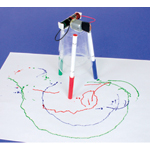
ScooterArt 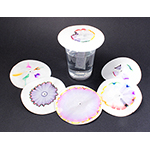
Chromatography Filter Paper
And then there are Squishy Circuits and Lux Blox kits. These allow kids to bring some creative designs to physical constructions with an artistic flavor. Squishy Circuits fit beautifully with electricity. Lux Blox kits are perfect for design and build challenges.
Arts and crafts aren’t limited to construction paper and glue. A big part of art is the aesthetics and visual impact. Art can be tactile. For instance, there’s a beauty to the variety of colors and textures of Slime. Rather than just focusing on the chemical science of slime, why not appreciate the artistic beauty as well? Letting students decide the color and texture of their slime brings an artistic flavor to the science and increases student engagement.
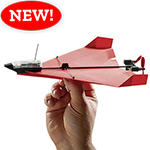
PowerUp kits bring the art of paper airplane folding to life. Plus, they’re the perfect integration for air pressure and flight. Kids can fold a variety of planes complete with decorations and decals. Then it’s time to take things to the next level by slapping on a power pack and propeller to take your artwork to new heights. Teachers can choose to delve into the science content before or after the students design and build.
How about Some DIY STEAM?
Of course, teachers can also take the DIY STEAM route. Keep in mind that, if students are working from home, it’s important to keep the materials as simple as possible. Parents are already busy enough; it’s best not to ask them to take a trip to the craft store for foam board and glitter.
Let’s start with something basic. Baking soda and vinegar are common ingredients in the average food pantry. Together, they can be used for more than chemical reactions and inflating balloons. Why not turn them into science art?
If students are learning about science concepts that can be illustrated in a diagram, it’s easy to turn their understanding into an art project. Tell students to grab some baking soda, cornstarch, food coloring, and vinegar. Mix four tablespoons of cornstarch, five tablespoons of baking soda, and six tablespoons of water—plus a few drops of food coloring—to create a baking soda slurry. (The cornstarch makes the paint thicker, so cut back on the cornstarch if the slurry is too thick.) Send your students outside to design their diagrams using their homemade sidewalk paint.
A lesson on the solar system could end with students painting the planets and the Sun. The life cycle of a butterfly is the perfect inspiration for a sidewalk painting. The phases of the moon could be a compelling muse for a sidewalk mural. What about the water cycle or parts of a flower?
It’s easiest to have students draw an outline of what they want to paint with chalk. Then they can pour some paint in a little puddle and spread it out with a paintbrush. Squeeze bottles also work well. When they’ve finished, they simply grab a cup of vinegar and dump it on their painting to see their sidewalk art fizz to life. Guaranteed to evoke a reaction!

Another DIY STEAM Idea
Let’s try some other common ingredients. An artistic way to learn about cloud types begins with some shaving cream and Elmer’s Glue. Instead of labeling a worksheet, why not let your students finger-paint different cloud types by mixing shaving cream and glue? Aluminum foil or wax paper is the perfect canvas for a shaving cream and glue painting. You can use paper, but the glue may soak through the paper and possible stick the surface below.
FunScienceDemos has a short video walking you through the entire process. Measuring the shaving cream and glue is a bit tricky. It’s easiest to think of it as an ice cream sundae. You start with a bowl of ice cream and pour chocolate syrup on top until it rolls down the sides. In this case, you start with a mound of shaving cream (enough to fit in a bowl) and drizzle glue on top until it puddles around the mound of shaving cream. The glue ensures that the shaving cream won’t evaporate and the cloud paintings will be puffy and permanent.
Clouds, Continued…
You can start with thin, wispy cirrus clouds at the top of your canvas. A single fingertip is best for making cirrus clouds. Next you can move down to cumulus clouds. I would recommend using four fingers when making cumulus clouds. You’re going for a puffy top with a flat bottom. The shaving cream and glue are the perfect consistency for making thick, puffy clouds. Stratus clouds should end up at the bottom. The best way to get a layered effect is to use your entire hand. If there’s enough room, students can plop in a cumulonimbus cloud that stretches high into the sky with a flat, anvil top.
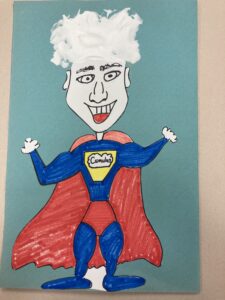
After their creations dry, I usually have the kids cut out each individual cloud. They can arrange the clouds on a piece of blue construction paper. Another creative option for clouds types is to have students design cloud super heroes. After drawing a super hero body and picking a specific cloud type to draw on the insignia, students can use the shaving cream and glue concoction to create specific hair styles that mirror the type of cloud they picked. Stratus Man would have cascading hair. Cumulus Girl would have puffy and fluffy hair. Cirrus Guy would be balding with thin and wispy hair.
And Then There’s Salt…
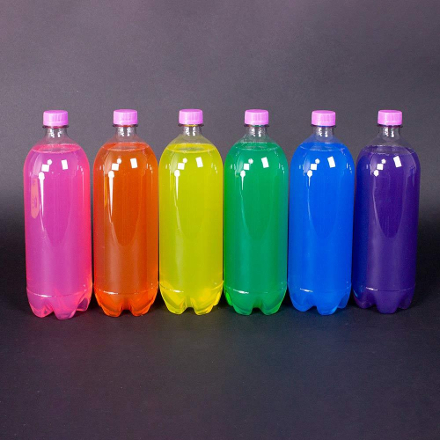
Finally, there’s nothing more common than salt. Turn your density lesson into an art display. A few clear glasses filled with water and differing amounts of salt and food coloring allows students to create a rainbow-colored density column in a straw. It’s like holding a rainbow in your hand. Plastic cups make the perfect container.
Start by measuring one teaspoon of salt into the first cup. The second cup would get two teaspoons of salt, and the third cup would get three teaspoons of salt. You’re basically adding an extra teaspoon of salt with every new cup you add. The more salt you add, the denser your solution becomes. Next, add one cup of warm water to each container and stir.
Pull out some food coloring and make each cup a different color. Now it’s time to grab a straw. Most kids have the experience of trapping soda in the bottom of a straw by capping the top of the straw with their thumb, lifting the straw out of the cup, raising their thumb off the straw, and watching the soda splash back into the cup. We’re tapping into that schema. Start by dunking the tip of a clear straw into the first cup with one teaspoon of salt solution. You’re looking to go about ½ inch deep. Cap the top of the straw with your thumb and pull the straw out of the solution. Don’t remove your thumb from the top of the straw.
Next, move the straw to the two-teaspoon solution and dip the straw about ½ deeper than you did into the first solution. If you lift your thumb and replace it, the next layer will move up into the straw. Repeat the dipping process in each cup continuing to dip deeper and deeper with each cup until you’re holding a rainbow.
Taking It Up a Notch
If you find your students are enjoying expressing themselves artistically, you may want to try something a bit more challenging. With a little planning and an upgrade of materials, students will love making paper circuit pictures with some foil tape, LED lightbulbs and a battery. This works brilliantly with any holiday. Students can illustrate a holiday picture and run a circuit on the back of the card using foil tape and LED lights. Pull the shades down and watch their artwork glow. Students can even use foil tape along with a Styrofoam plate and some construction paper to make a jack-o-lantern that lights up. FunScienceDemos has tutorial videos that walk you through paper circuits and LED jack-o-lanterns.
In Conclusion
Cavemen displayed their artwork on cave walls. In the modern era, kids’ artwork goes on the refrigerator or classroom bulletin boards. Science-based STEAM artwork becomes a little more challenging to showcase online—but certainly not impossible. Students can easily share in a Show-and-Tell session during a virtual class meeting. They can also snap a picture of their artwork and make it their profile picture online or render it as a background image on their computer. Tap into the creativity of integrating the “Arts” into STEM learning and your online lessons will be running full “STEAM” ahead.