 By Tami G. O’Connor
By far, my students’ favorite way to review for tests and quizzes was a game we called “Keep Your Shirt On.” I found that I was able to use this game for virtually any subject and any grade level. No matter what subject, my students’ scores increased dramatically! As long as your students can read, they can use this tool.
Keep Your Shirt On was a great review game before math tests (multiplication, division, addition, subtraction or properties), Social Studies (state capitals, explorers, landforms…) and especially Science!
Make a Review Set Now
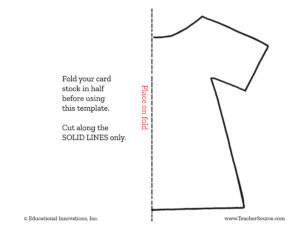
This review game is easy to make. Once you’ve made a set, it will last for years. The only materials needed are thin markers, 8 x 10” card stock (I used colored), and a T-shirt template—click here for PDF.
Using the T-shirt template, trace and cut out a bunch of card stock T-shirts. Make a few more shirts than the number of students in your class. Once all the shirts are cut out, write a question on the middle of the first shirt. It’s better when the question can be answered with one word or a short phrase.
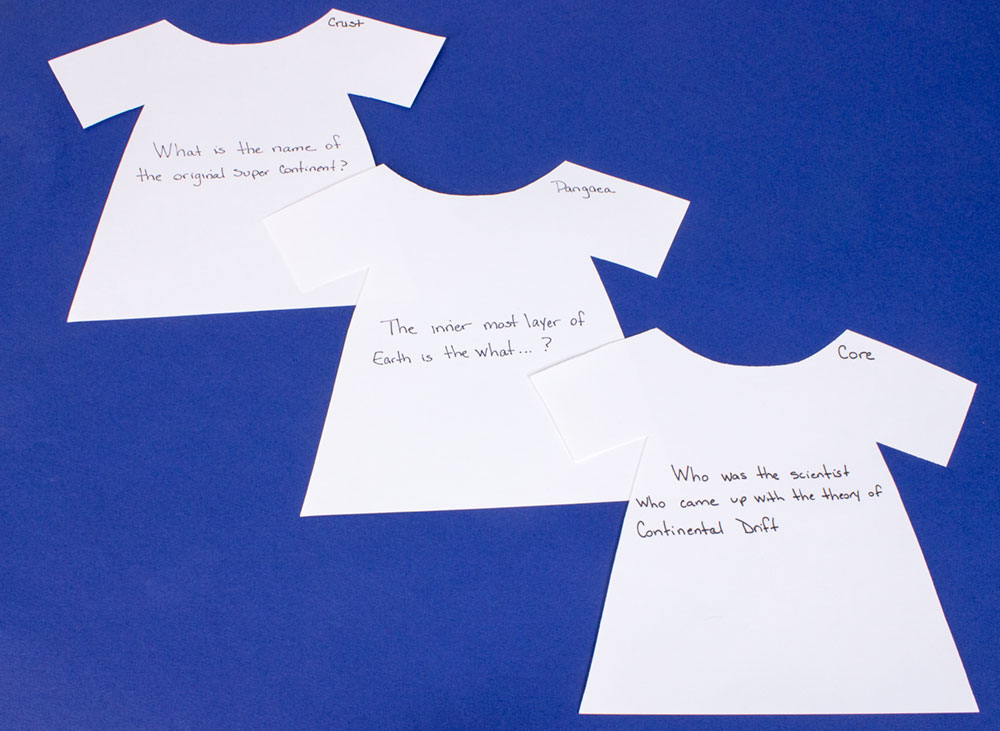
Next, on a new shirt write the answer to that question on the top right sleeve. Then, write the next question on the front, middle section of that same shirt.
Continue on until you have enough questions for the number of students in your class. When you get to the last question, write the answer to that question on the sleeve of the very first shirt you started with. This will complete the T-shirt set.
Let the Game Begin!
Once completed, mix up the T-shirts, and hand one out to each student. Allow them to read the question and the answer, but don’t let them share their card with other students. Once they are acquainted with the question and answer on their T-shirt, it’s time to randomly select a student to begin.
He/she reads aloud the question on the shirt. Each student in the class then looks at the sleeve of the shirt in their possession. The student whose shirt contains the correct answer shouts the answer and then reads the question on his/her shirt. This continues until the student who read the first question has the correct answer on their sleeve to the question asked.
If done properly, each student answers one question and asks another. This game is wonderful because it forces each student to listen carefully to the questions because they need to know if the answer is on their sleeve (and they never knew which shirt they would get the next time around).
After the first “practice” run, collect all the T-shirts and shuffle them. Hand them out again so each student receives a new T-shirt. Now the fun begins! Grab a stopwatch (or a watch with a second hand) and play again. As soon as the first student is selected to read the first question, the time starts. Once that same student answers the last question, the time stops. The challenge is to break the best time.
I had a space reserved on my whiteboard for the best time, and I always gave my students a treat each time they beat it. It could have been an additional five minutes of recess or a Jolly Rancher. This was a great activity in my classroom when we had a spare five minutes, and it was clear that the kids truly knew the material!
A Variation…
What if you normally have a class of 23 and one student is absent? You can do one of two things. You could give one student two shirts. Or you could do as I did, which is a little more complicated, but well worth the effort.
You can make up shirts that account for one or more absences. For this example, let’s say you normally have a class of 23 students. The example I will give will be easiest if we use multiplication questions. Start off by making up your complete set of 23 shirts. On the first shirt you made, label it as 1. The easiest way is to mark the number lightly in pencil on a corner on the back of the shirt, so it’s not easily identifiable. On the last four or five shirts, mark them the same way with the question number on the back. (see example). If everyone is present, you have a complete set of 23 and you’re good to go. However, if you have any absences, you will need to pull from the reduction shirts.
Keep in mind that you need to make “reduction shirts” that will take the place of the last card. For example, if you have three students absent, you will only need 20 shirts, so you will need to complete the question loop early.
This video will explain the process of how to create shirts for when you don’t have your entire class present. Enjoy!