 by: Norman Barstow
Simulated Fossil Dig
Archeology is the study of society through the discovery, recovery and analysis of the material culture and environmental data that humans have left behind. The data can include artifacts, architecture, and cultural landscapes.
Paleontology is the scientific study of prehistoric life. It includes the study of fossils to determine organisms’ evolution and interactions with each other and their environments. Most readers will recognize fictionalized accounts of the action and adventures in the pursuit of archeological or paleontological discovery from such blockbuster films as ‘Indiana Jones’ or ‘Jurassic Park’. While this exercise may not feature the nonstop action and Hollywood fanfare of those films, it is still a fun and valuable classroom activity, not to mention much less expensive.
Objectives
The student will:
- Practice fossil preparation skills using real tools and techniques by removing real fossils from an artificial matrix.
- Be able to explain the difference between a chunk (broken piece) of fossil and a complete fossil bone.
- Be able to list reasons why broken fossils are more common in nature than complete fossils.
Materials
* Plastic butter tubs (1 per student) OR larger plastic trays (for a student group).
* Sand (use contractor or play sand, clean, with no pebbles)
*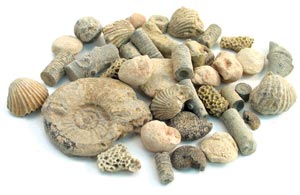 Fossil Sorting Kit from Educational Innovations
* Potting soil (to add to matrix mixture and to cover the completed matrix).
* Plaster
* Water (sink)
* Bucket
* Stirring stick
* Small rocks and pebbles (per tub/tray) to add reality to the scene.
* Dental picks (w/erasers on one end, 1 per student) or dental picks with handles **
* Plastic knife
* Toothbrush or other stiff brush. (1 per student)
* Plastic trays (1 per student)
* Ziploc bags (1 per student)
* Permanent markers (1 or more)
* Pith helmet (optional)
** Available from the Widget Supply Company
Set-up / Preparation for Fossil Dig
At least 24 hours prior to the class (but not more than 2 to 3 days prior), create one ‘fossil jacket’ per student, or group of students.
- Set out plastic tubs on a flat surface that can be easily cleaned, such as a counter in your classroom, or outside on the grass, near your sink, water source or hose. Have your rocks and fossils nearby and easily accessible.
- Combine 2 parts sand and 1 part potting soil to 1 part plaster (a plastic cup is a good part measure) This makes enough in a batch that won’t dry too quickly, but can be used before it dries out too much.
- Stir dry ingredients together with stick. Add water and stir until consistency is thick but not runny, but also not dry.
- Spread the sand/plaster mixture into a tub and smooth it out. Place the fossils in the matrix/mixture. Cover with more of the sand/plaster mixture. Repeat for each tub until finished. You will likely have to mix several batches of sand/plaster mixture to finish all tubs.
- Stick some larger rocks on the top layer and cover with dirt. (optional)
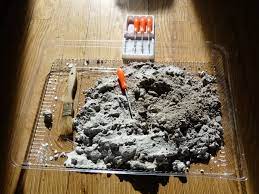
- Leave to dry in a dry place overnight.
(You may want to experiment with this process well before the class date so that you can judge the consistency you will need to make the sand/plaster mixture and the amount of time and materials necessary for your group. Also, the longer the jackets dry, the harder they become. Plan accordingly for the age of your group.)
Fossil Dig
- Explain to the students that they will be acting as paleontologists, excavating a fossil site and performing the job of a preparator – cleaning fossils for identification.
- Show students the tools that they will be using. Discuss proper and improper use of tools.
- The students are now ready to excavate. Pass out a dental pick, toothbrush, plastic knife, and tray to each student, or use a larger tray for a group of students. (It is helpful to have extra hands for this step.)
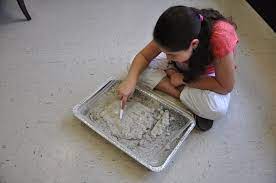
- Begin the preparation. The most realistic model of prepping would be to cut the sides of the tub down to the level of the matrix and just work from the top down, exposing more surface area as you go. However, if you don’t want to cut the tubs or work from the tubs, you can have the students carefully remove the entire contents (making sure the matrix remains whole) and then work from the top down.
- For older students, you can prepare for them or help them prepare a grid, using small nails for posts, and string to mark the areas to be explored.
- Monitoring progress: remind students about proper technique. Remind students that they are not to ‘stab’ at the fossils. Also, watch to make sure students don’t ‘stab’ their hands as they are holding the jacket, making sure to always point or press the sharp end of the tool away from their hand.
- Soon, someone will make a discovery. Hand out Ziploc bags (1 per student) and write each student’s name on his/her bag. They can keep their finds in the bag and clean and identify them later. As discoveries occur, talk to students about what they found. Is it a rock? Is it part of an animal or flower? Why do you think that and how can you tell? Make sure that each student will be able to explain to their parents what they have found and how they are different.
- As faster students finish you can assign them jobs to help clean up or ask them to help others who need assistance.
- Anyone not finished at the end of the allotted time can take what they have leftover home in their bag.
- Later, have students identify their cleaned and sorted fossils by comparing them to the Sorting Guide which is included in the Fossil Sorting Kit.