 by: Brian Herrin
One of the difficulties of modeling a flowing water system is the size of the system and the quickness of the flow. This often makes demonstrations hard to visualize as things happen so quickly. The model I designed uses large transparent plastic cups and clear tubing that connects them to easily demonstrate how a river can become contaminated by a toxic spill or dump and how the toxic material slowly works its way downstream creating devastation along the way. In time, the river will eventually run clean, but the damage takes much longer to disappear, and some damage may be permanent.
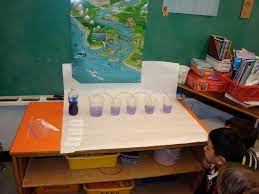
Begin by setting up a mock river system using six to ten separate cups. There is no limit to the number of cups you can use. The siphon tubes used to connect the cups are made of 6.4mm (inside diameter) clear tubing cut into 40cm lengths. You can use aquarium tubing and smaller plastic cups but a slower system will result. You will need one less tube than the number of cups you use. For a self emptying system, you can insert a smaller tube into the last cup that empties into a larger container.

Each cup in the river should be filled 1/3 with water with water-filled siphon tubes between each cup in the line, as in the diagram above. To fill a siphon tube, lower one end into a filled pail of water and then slowly lower the other end of the tube into the water allowing the air to escape. When the tube is completely filled cover the ends with your index fingers, lift the tube out of the pail and place the ends of the tube into two of the side by side partially filled cups above, releasing your fingers when the tubes are under the level of the water in the cups. If you get a small bubble in the tube, lift one of the cups to allow the bubble to be forced out of the tube by the flow of water from a higher to a lower level. Repeat until all the cups are connected and the tubes are completely filled with water. Any large air bubbles may disrupt the flow so be sure to remove the excess air.
Add 2 tbsp (30ml) of an acid base indicator to each of the cups. This can be made by cutting up a few red cabbage leaves into small pieces and placing them in one cup (250ml) of boiling water. A much easier way is to use Red Cabbage Extract from Educational Innovations. The infusion should turn a purplish color. If it is not dark enough, remove the cabbage pieces and put in another chopped up leaf or two or add a little more extract. Next, add a pinch (no more) of baking soda (sodium bicarbonate) to each cup. When the baking soda is placed in the cups of red cabbage solution it should turn the solution in the cups a light blue. You should now have all the cups filled to the same level with a light blue solution connected by clear, water-filled tubes. It is essential that all the tubes be filled with water and all the cups are the same color before you introduce your “chemical spill”.
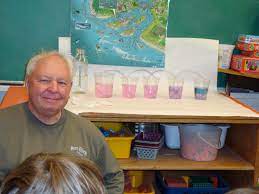
Although the water is not flowing at this time, this is now a model of the river before the “chemical spill”. Inform your students that each cup represents only one section of the river. Tell a hypothetical story about railway tank cars carrying a toxic liquid that traveled alongside the river. Explain that there was a derailment on the way, and the tank cars tipped into the river spilling the liquid. Mention that the toxic material spilled into the river will ‘kill’ living organisms in the river. Use the model to explain that if the blue river water receives enough of the chemical spill to kill the wildlife in the river, the toxins will turn the water pink.
Now use four or five fast-food vinegar packets to simulate the train cars. Open them and empty the “toxins” (vinegar) into the first cup.
You should see the water in the first cup immediately change color to pink. Begin adding plain tap water to the first cup. You will notice that if you pour slowly, the water will gradually siphon into the next cup. As the water in the first cup (with a higher level of liquid) moves into the next cup, the “toxic waste” will begin to contaminate the second cup. The result is that the water flowing through the tubes into each subsequent cup will change from blue to pink until eventually, all the cups are pink demonstrating contamination.
By placing a 50cm smaller, water-filled tube made from aquarium tubing into the last cup and draping it over the edge of the table or chalk ledge you can let it pour into a pail so your river will keep flowing as the cups gradually empty.
If you keep adding water to the first cup your model river will gradually run clear. You do not need to have a tube if you empty the last cup now and then without losing the siphon effect. Emphasize that the model river has cleaned itself but the organisms that have died are gone and until the river repopulates from upstream or downstream where the toxic chemical has been diluted enough, the river will be ‘dead’ along that stretch.
This is a very powerful model that is not soon forgotten, and if you accompany the demonstration with the information surrounding a real chemical spill or a toxic seepage into a river, it is a real eye opener on how much damage can result. Something to remember is that we all live downstream from somewhere else.
Brilliant! Love using packets of vinegar- good connection to the idea of boxcars. Thanks for sharing!