 by: Bennett M. Harris
It never fails. I get the same reaction, whether I present to seasoned physicists, grade level science teachers or even from the most discerning audience I’ve had; a group of fifty – fourth grade students, jaws gape and sounds of oohs, aahs and wows issue forth.
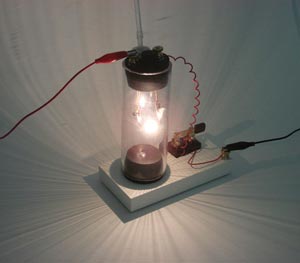
I’ve been in rooms surrounded by hundreds of artificial light sources, from the simplest incandescent bulbs to the most advanced OLED displays, and even so, when a person closes that knife switch and current begins to flow and a simple piece of pencil lead held suspended inside a partially evacuated chamber starts to glow brighter, brighter, and finally white light illuminates the chamber, something happens in the person’s brain. At once they are connected with the wonders that Sir Humphry Davy, Swan, and Edison felt when they experimented with the world’s first electrical light sources. Questions start to form; How does that work? How could we make it last longer? What would happen if we changed the carbon for some other material? All at once, the passive viewer is thinking scientifically, asking questions, and yearning to do more.
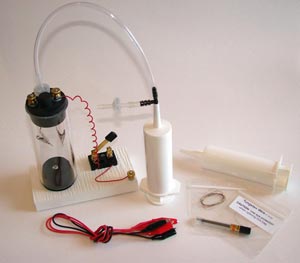
I’m talking about “Reinventing Edison: Build your own Light Bulb”, a science kit that I am proud to have designed. I created the kit to be fun and interesting while at the same time integrating history and invention into science and mathematics. The kit is designed to work as a safe, hands-on, inquiry based science experiment for both qualitative and quantitative experiments. But It also works well as an engaging demonstration at the front of the classroom.
 Some ideas for demonstrations include:
1) As an example of science, invention, and history for your grade 3-5 class.
2) As a day one introduction to your middle school physical science class.
3) As an introduction to your high school physics class or electricity lessons.
4) As a demonstration of quantitative data gathering and properties of matter for your middle or high school physical science class.
5) As an illustration of the scientific method AND proper safety procedures for your technology or engineering class.
6) As a demonstration to introduce the electricity section of your college physics lecture.
No matter what your grade level or subject area, the Reinventing Edison kit can be a very effective way to create interest in your students, get them asking questions, and help them to get excited about what will come next in your science lectures or labs.
This article will detail some tips and tricks for effectively using the kit as a demonstration based upon my own experience using the kit in front of many different audiences. I will not go into specific details on how to setup or use the kit as those instructions are included in the instruction and experiment manual that is included with the kit.
First things First: Safety
The Reinventing Edison kit is designed with safety in mind, however as with any science experiment or demonstration there is some risk involved if proper safety procedures are not observed. Make sure to read, understand, and follow all safety instructions printed in the manual. Risk of eye injury is minimal, but it is always a good idea to wear eye protection both for your safety and to demonstrate proper lab procedures.
Filaments, especially the carbon and tungsten filaments, will glow to incandescence, potentially emitting a bright white light that can light up a room. It’s advised that you and your audience never stare directly at the filament after it starts to glow beyond a cherry red color.
Remember filaments and conductors of heat in contact with the filaments will get very hot. Always allow a minute or more for the filament, clamps, and bulb cap to cool before handling after each experiment. In this way you will avoid singed finger tips and can avoid uttering things that you shouldn’t in front of sensitive ears (such as the seasoned physicists that I mentioned above).
Always wear a lab coat while performing experiments with the Reinventing Edison kit. This is in no way a safety issue, they just look cool…
Keep Things Simple in the Build Your Own Light Bulb Demonstration
In some of my first demonstrations of the Reinventing Edison kit I made the mistake of trying to cram too much into a short period of time and performed in front of a large audience. I had volt and current meters set up, multiple power sources, and was prepared to talk for hours about the history of Edison. I forgot my purpose was simply to grab the attention of my audience and not to teach a years worth of electrical engineering and history! The important lesson that less is more had eluded me.
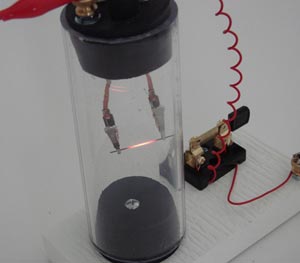
When using the Edison kit as a demonstration I recommend that you choose a simple configuration (series circuit) with a filament choice that will give a guaranteed result the first time you throw the switch. The included carbon filament (pencil lead) works best, glows red for a time, and then glows bright white for a minute or more before burning out.
The included tungsten filament glows bright white for a lot longer than the carbon filament, and as a result, might actually have less of an impact than a filament that burns out within a minute or so. An audience of any age will have their wow moment as soon as the filament reaches incandescence and will usually sit spell bound for about a minute wondering if it will burn out (especially if you keep them going with what you are saying), but they won’t usually last for the three or more minutes that a tungsten filament may last for. Save the Tungsten filament as a closing experiment and give a quick lecture or answer questions while you wait for it to burn out.
Remember the History!
Reinventing Edison is as much about history and invention as it is about science or math. I like to start any demonstration by asking the audience to close their eyes and imagine a time when there was no light source except the sun or fire. When it was dangerous or impossible to travel at night time. When a forgotten candle might burn down your house. When you didn’t have electrical devices in your home because you didn’t have electricity in your home.
I then talk about Edison and how creating the light bulb was not solely his achievement. It’s good to talk about earlier demonstrations that Sir Humphry Davy performed using giant batteries and carbon filaments for college audiences as well as the contributions of the English chemist Swan. Edison patented the bulb and all of the systems required to manufacture, distribute, and power them first, but even then, it was not solely his effort. He had a team of hundreds working for him.
The following link contains a bibliography of sources that I used to research the science and history behind Edison and the Light Bulb. If you want to learn more I highly recommend the sources listed.
http://www.scribd.com/doc/18219124/Reinventing-Edison-Reading-List
Be Prepared – BUT remember, when things go wrong this is a teachable moment!
Its a good idea to perform your intended experiment by yourself before you have an audience in order to work out any bugs, determine the timing requirements, and learn how to deal with any “surprises” that you may experience. I’ve found that mistakes or problems while operating the bulb often work to build suspense in an audience and function as “teachable moments” to illustrate science facts. If you do encounter problems, remind your students that Edison experimented for several years with thousands of different filament materials until he got a bulb to work!
When I demonstrated the bulb to a group of 50 fourth grade students I had wired my batteries incorrectly. So I talked about the bulb, how it worked, what I was going to do next. I asked my assistant to dim the lights and then to flip the switch. And when they did, the filament smoked and immediately exploded into two pieces. Too much current, too little voltage, no incandescence. I still got a wow when it exploded (thanks to the camera projecting the bulb onto a larger screen) but not the BIG wow I wanted from the moment of incandescence itself. Without missing a beat I talked about Edison’s thousands of experiments and asked the audience if they thought two or three tries for us would still be respectable. I then talked about the problem (parallel batteries instead of series batteries) and told them I would wire the circuit a different way, changing a variable, and seeing what would happen next. My blunder turned into a “I meant to do that” moment that would have made professor Pee Wee proud.
Get the Audience Involved and Have Fun!
The more interactive your presentation is the better it will be. Everyone has sat in boring power point slide lectures that left them less intelligent than when they came into the room, and most of us have ended up giving a few of those presentations in our careers, too. But remember, science is about asking questions. Ask your audience (the students) questions about what you are doing. Who invented the light bulb (they’ll say Edison, you can counter with “he is credited with inventing it, but have you heard of Swan?”) Ask them to predict what will happen next if you change something about your experiment. Ask for volunteers to verify that the pencil lead you are putting into the bulb is really just ordinary pencil lead. Get a volunteer to throw the switch or ask the crowd to countdown like a rocket launch. Most importantly have fun with what you are doing. You are modeling the idea that science and technology can be interesting and rewarding not just math-filled, difficult, or boring. If something goes wrong, use it as a moment for comedy. I had an electronics teacher in high school who every year would work on a TV set during open lab periods and every year he’d cause a huge electrical arc to jump between the high voltage terminal and the chassis seemingly by accident. He’d then jump up and run away from the bench in fear in a display that would have made Lou Costello proud. This definitely got students attention and made for a memory that I still have decades later. Just remember, keep things serious around safety and around facts, but keep things fun, open, and accessible overall.
Don’t forget the vacuum
Your demonstration is likely focused on electricity and light, and hopefully history, but it’s easy to forget what isn’t there… the vacuum! Achieving incandescence in a filament is dependent upon removing as much air from the bulb as possible. Air hinders incandescence in three ways; air conducts heat away from the filament such that it does not heat up to the point of incandescence, air can support combustion of materials like carbon and thus causes them to physically burn up quickly, and the oxygen in air can combine with the hot filament material and oxidize it weakening its structure and causing it to burn out more quickly.
Obviously the hand vacuum pump included in the kit cannot remove all of the air in the bulb, but it does remove enough that you can achieve several minutes of operation from carbon and tungsten filaments. Air is invisible, and so to illustrate the working of the pump you can ask for a volunteer to report their observations. For example, hearing the pump operate, feeling as it becomes harder to move the piston as they remove more air, and feeling for the air that is coming out of the pump. You can also use the bulb (minus a filament and electrical connections) as a mini-bell jar and use it to boil a small amount of water, inflate a small tied balloon, or expand a marshmallow.
An interesting fact: Many years ago, light bulbs had a nearly complete vacuum, so if they broke they made a very deep implosion sound (check out any black and white film where a light bulb breaks to hear what this sounded like). Today bulbs are only evacuated to about one fourth atmospheric pressure with the oxygen replaced by the inert gas Argon.
Due to risk of implosion I don’t recommend that you try to use a powered vacuum pump with this kit.
Finally a few technical tips for a good demonstration
We’ve received very few trouble reports from users of the kits since we started making them in 2004, but we have found that 99.9% of all problems have come from using the wrong kind of power supply. For best results make sure you use two fresh 6-volt Alkaline lantern batteries. Carbon Zinc batteries are less expensive, but they cannot supply enough current to support incandescence. Alkaline batteries almost always say “Alkaline” but Carbon Zinc batteries usually just say “Battery”… one way to tell the difference is that most Alkaline batteries have a metal shell and Carbon Zinc batteries have a plastic or even cardboard shell. Also, make sure you keep up with the cap-covers for the batteries. Cap-covers are plastic insulators that prevent the metal terminals on the battery from shorting out if they come into contact with a conductor.
The top stopper in the kit is designed to pull inside the clear plastic tube should an actual vacuum pump be used with the kit. This is an intentional design put in place to to avoid any implosion risk. Since rubber stoppers vary a little bit in diameter and are softer when they are new, your top stopper might pull inside the tube when you use the hand-vacuum pump. If this happens you can fix the problem by tightening the hex-nuts on the screws that pass through the stopper. You should also make sure to press the vacuum release stopper as deeply as possible into its port. This will cause the stopper to expand in diameter a little bit and should reduce its tendency to pull inside the tube. If the stopper does pull inside the tube, you can retrieve it most easily by removing all wiring and the vacuum pump and then push the stopper through from the top to the bottom of the tube. This is another reason to assemble and test your kit before going on stage in front of an audience.
Always remember to open the knife switch on the bulb after every experiment. When the filament burns out it is very easy to immediately jump to changing the filament for your next experiment. Remember, if you don’t open the switch then you can potentially cause a short circuit while handling the bulb cap, or you may have a hot filament in open air or in your hands while you work with it. Always double check the knife switch before changing the filament!
For a High School or College level demonstration of the kit, it can be useful to monitor, display, or report the voltage drop across the filament and current drawn by the filament. This can easily be accomplished by standard bench meters, display meters, or even probeware or data logging equipment. It is important to make sure that you use equipment rated for the voltage source you are using (usually 10 volts since you will be using 6 volts, and 1-amp or higher for current). Light levels may also be monitored and compared to voltage/current using data logging or probeware equipment.
For Frequently Asked Questions and Troubleshooting tips you can read or download the following document: http://www.scribd.com/doc/18400229/Reinventing-Edison-FAQ-and-Troubleshooting
Conclusion
Thank you for reading this article. I hope that you found it interesting and learned at least one or two things that will help you make a spectacular presentation to your students. Enthusiasm for all areas of STEM education is important, and if we can help inspire just one person all of our efforts were worthwhile.
If you use the Reinventing Edison: Build your own Light Bulb kit in your class, for a demonstration or as a classroom activity we’d love to have your feedback. Feel free to share pictures, video clips, or comments with us at our Fan Page on Facebook: http://www.facebook.com/HarrisEducational.
About the Author
Bennett M. Harris holds a degree in Technology Education from North Carolina State University and has many years of experience developing educational materials, teaching, and tutoring students of all ages in many different STEM (Science, Technology, Engineering, and Mathematics) topics. Bennett is the founder of Harris Educational and the originator of Reinventing Science kits.
[…] If you liked this blog or the Reinventing Morse science kit, make sure to check out: Reinventing Edison: Build Your Own Light Bulb. […]
Great article!!! This activity will definitely have students excited about the science behind the light bulb. I also recommend reading another great article that describes a comprehensive timeline to the history of the light bulb. here is the link:http://www.delmarfans.com/educate/basics/who-invented-light-bulbs/