 by: Martin Sagendorf
Taking a photo in the UV is relatively easy and produces a somewhat different view of what we see in visible light. All that’s required is a small bi-convex lens, a cardboard box, some pieces of thin cardboard, a pack of ‘Sun Paper’, and patience.
 As we know, sunlight contains ultraviolet, visible, and infrared ‘colors’, and we can ‘see’ only the middle wavelengths of this ‘optical spectrum’. Infrared is invisible, but we feel it as heat and likewise, at the other end of the spectrum (at much shorter wavelengths), the ultraviolet radiation is also invisible, but it is very energetic and damaging (as shown by the fading of paint and our sunburned skin).
So the question is, “How can we see UV?” Well, we can’t do so directly, but we can use a special paper having a chemical coating that’s particularly sensitive to UV. It is the same type of paper that was used with blueprint machines using a UV lamp and ammonia fumes to copy drawings made on transparent paper.
How to Make a UV-Sensitive Box Camera:
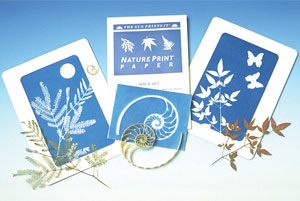 For our box camera we’ll use a very special paper, a lens, and plain tap water, and a box. The paper is inexpensive as is the lens, and the cardboard box is free-for-the-finding.
The paper is Nature Sun Print Paper and is available in packages of forty 5” x 7” sheets – plenty enough for lots of experimenting.
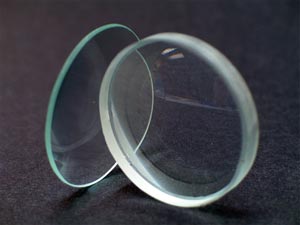 The lens used here is a 50 mm diameter biconvex lens with a focal length of 250 mm (10”) – this lens is available as one of a two lens package: Pair of Lenses (Biconvex and Biconcave). The long focal length of the lens is quite necessary – a hand-held magnifying lens having a short focal length lens will not work (it’s projected image is much too small).
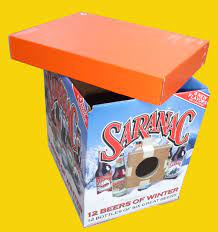
The box is any stiff cardboard box with a 10” front-to-back dimension and wide/high enough to accommodate a piece of 5” x 7” Sun Print Paper on the rear wall. An oversize box can be cut down to size. The critical dimension is the 10” between the outer front surface of the box and the inner surface of the rear wall of the box. Interestingly enough I found the ideal box to be one that originally contained twelve 12 fl. oz. bottles of beer. It would probably be wise to cover or paint the box sides before bringing it into the classroom.
The simplest construction is to cut a hole just smaller in diameter than the lens (1-3/4” for a 2” diameter lens) – centered in the front surface of the box, and tape the lens’ periphery to the box’s surface. Try this first. If the images are acceptable, then use the camera this way. However you might wish to experiment with differing lens-to-paper distances. This is easily accomplished by making a ‘lens sandwich’ that can be placed outside or inside the box’s front opening and easily ‘shimmed’ with additional thickness of cardboard.
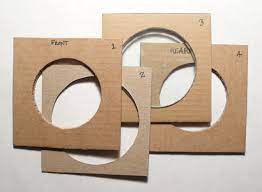
An easy-to-make ‘lens sandwich’ is made with four thin pieces of cardboard – in this case, the box lens opening is a cutout 2-1/4” in diameter). All four cardboard pieces are 2-3/4” square.
Front Piece: 1/16” thick – 1-3/4 ” hole (shoebox corrugated cardboard)
2nd Piece: 0.030” thick – 2-1/4” hole (from the backing of a writing pad) – this piece adds some ‘outer’ thickness to prevent ‘bulging’ of the assembly
3rd Piece: 1/16” thick – 2” hole (shoebox corrugated cardboard) – perhaps just a bit smaller to hold the lens diameter snugly. The lens is fitted in this layer
Rear Piece: same as Front Piece
Stack the cardboard pieces, with the lens ‘sandwiched’ inside, and tape or glue the assembly together. It can then be either taped or glued over (or inside) the box’s front opening. I suggest using tape to fasten the lens sandwich until it’s ascertained that the focus is acceptable.
The cover for this camera was fashioned from the top flap of a shoebox.
Now to the patience part: The paper’s sensitivity to reflected UV is very low, (it’s even less to visible light) thus it’s perfect for this camera. And, remember, we’re not pointing the camera at the Sun, rather we’re going to photograph reflected UV (from the sky and earth-bound objects) – these all present a very low intensity of UV, and we’re using a glass lens (and glass is rather opaque to UV wavelengths).
However, we do have the advantage of time. We can take very long exposures – four or six hours or even longer. Simply tape the Sun Paper to the inside rear surface of the camera; put the lid on, and place the camera pointing in a direction having foreground objects against the sky. A very clear day is preferable, and obviously summer time will provide the most UV light.
When shooting in the sun’s direction, any direct sunlight falling on the lens may ‘fog’ the image. To avoid this, either place the camera under an overhang or place a piece of cardboard on top of the camera extending beyond the front edge of the box – a 6” overhang is usually sufficient and will not obstruct the image. Also, any camera motion (as from wind) will blur the image – a weight placed on the camera (and cardboard) will prevent this.
When an exposure is finished, remove the Sun Paper from the camera and dip it into a shallow dish of water. Only about 30 seconds are necessary for full development. If all went well, there will be a light blue negative image. Dry the paper by sandwiching it between successive changes of paper towels (paper napkins work even better). Use a thick book as a top weight (this will prevent the photo paper from ‘rippling’).
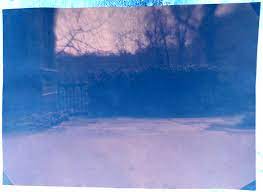
Once dry, the image can be scanned or simply photographed with a digital camera (as done here). Note that, in the image, the sky and the foreground flagstone patio provided the most UV light and are therefore dark in the image. This is what you’d see if you could see only in the UV (or would you see the reverse?).

With the camera (or scanner) image downloaded to a computer, the image can be manipulated in computer photo software. Here the image has been ‘inverted’ (to make a ‘positive’) then enhanced by adjusting the contrast, intensity, and brightness of the image. In this (positive) image the UV light is now ‘light-colored’. The ‘white’ in the foreground is not snow, it is UV reflected off a flagstone patio’s surface.
This is truly a fun ‘whole-class’ science project (especially if groups build multiple cameras). It provides:
- Experiencing the construction of a scientific device that does demand attention to minute detail (dimensions)
- Optical principles (the focal length of a biconvex lens)
- The sensitivity of some chemicals (those on the paper) to only particular wavelengths of light and how this is displayed with the chemical’s immersion in water
- That we can only ‘see’ part of the ‘optical spectrum’
- That many science explorations require patience and (sometimes) many lengthy experiments
These cameras are a wonderful multiple-learning experience for any science class. Plus, every student can take home their own copies of both the original and processed images of something we ‘can’t see’.
Marty Sagendorf is the author of the book Physics Demonstration Apparatus. This amazing book is available through Educational Innovations and includes ideas and construction details, including all equipment necessary, for the creation and use of a wide spectrum of awe inspiring physics demonstrations and laboratory equipment. Included are 48 detailed sections describing hands-on apparatus illustrating mechanical, electrical, acoustical, thermal, optical, gravitational, and magnetic topics. This book also includes sections on tips and hints, materials sources, and reproducible labels.
