The Fire Syringe!


Tami O'Connor, Educational Innovationsby:  Tami O’Connor

The fire syringe sold by Educational Innovations is a wonderfully simple, yet impressive and dramatic demonstration that increasing pressure on a gas increases its temperature. Fire Syringe Demo

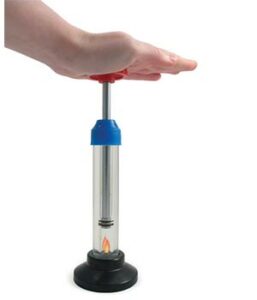
The fire piston, predecessor to the fire syringe was once used as a means of kindling fire in prehistoric Southeast Asia and the Pacific Islands. The apparatus used a hollow cylinder, sealed at one end and open on the other. A piston fit snugly in the cylinder and by sharply compressing the air, the tinder would ignite. This is an example of compression ignition.

This is also the principle behind a diesel engine.  Unlike gasoline engines, diesel engines do not have spark plugs.  Rather, the upward movement of the piston compresses the fuel vapor and increases the temperature to the point of combustion.  That forces the piston down thus turning the drive shaft.

Here is how best to operate a fire syringe:

Place the piston into the mouth of the cylinder and thread the collar back onto the syringe.  Place the syringe on a sturdy table.  Get a firm grip on the handle and force the piston straight down, FAST AND HARD.  The compression of the air causes the temperature of the gas to rise rapidly, igniting the material at the base of the cylinder.  If the compression is done too slowly the heat will dissipate before ignition will occur.  This can take a little practice, so don’t be discouraged if it doesn’t flash the first time you try it.  It may be helpful to prepare a few pieces of toilet paper or cotton fiber in advance. Read the rest of this entry »


Bubble Basics


by: Michelle Bertke and Melanie Bunda

Bubbles are always a fun and interesting activity for kids of all ages.  However, bubbles are not only fun, they are also an excellent teaching tool for some abstract concepts such as air density, dissolved gasses, and air pressure.  Below is a collection of bubbly activities that highlight each of these topics. Educational Innovations offers a full line of wonderful bubble products!

Gravity Defying Bubbles

Different gasses have different densities.  The air around us is mostly nitrogen (N2) and oxygen (O2), which are both lighter than carbon dioxide (CO2).  When a heavy gas, such as CO2 is placed in a tank, it will sink to the bottom without mixing.  This can be achieved by placing a few blocks of dry ice in a large fish tank or clear plastic bin covered loosely with a lid and allowing them to sublime.  This will take several minutes. Always use caution when handling dry ice by using proper gloves and safety goggles.

Once full, blow bubbles over the surface of the tank.  When the bubbles reach the interface of the two gasses, they will float.  If you fill the tank with CO2 unnoticed, have the kids speculate as to why they think the bubbles didn’t reach the bottom, and what might be in the tank.

An alternative is to fill a balloon with CO2 by filling it with baking soda (or an alka seltzer tablet) and placing it over the opening of a bottle filled with vinegar (or water).  Lift the balloon so the contents spill into the bottle and react with the liquid, allow the balloon to fill from the reaction, twist and remove.  Use it to blow bubbles.  Compare these bubbles to those blown with regular air (use a fan, not your breath for best results).  Have students compare the two bubbles.  Which one falls faster? Which one floats longer? Read the rest of this entry »


What Is That Stuff? An Instant Snow Polymer Lab


Elaine Kotlerby: Elaine Kotler

I created a lab using the Instant Snow Polymer (Sodium Polyacrylate) from Educational Innovations that I use in my 8th grade Physical Science Class as well as Summer School Programs that I teach for grades 4-9.  This lesson incorporates concepts of Conservation of Mass, Properties of Matter, Metric Measurement and Conversion, and Observation Skills.  The lab, as I give it to the students, is listed below.

Each student receives an empty baggie to be used for comparison, a baggie containing 12 grams of Instant Snow Polymer, use of a balance and a graduated cylinder.

I have already explained the Law of Conservation of Mass, and Density (they need to remember that the density of water is 1 g/ml, or look it up) prior to introducing this lab activity.  However, they do not know the terms exothermic, endothermic, hydrophobic or hydrophilic.  My students are allowed to look them up, but unless they make careful observations as they are conducting the experiment, they won’t be able to answer the questions later.

The final question “What is That Stuff?” garners some interesting answers. Some recognize a use for it as snow for ski slopes; others have suggested material for ice packs.  One suggestion was to use the powder to help clean up and absorb spills. Read the rest of this entry »


Simple Conservation of Mass Activity


Lee Walkerby: Lee Walker

When we are doing a Partnership for Learning.com Science Adventure on phases of matter we like having this conservation of mass experience in the bag of tricks. It can be done in minutes and is extremely reliable. All you need is the simplest (and least expensive) OHAUS classroom balance from Educational Innovations, the Ice Melting Block set from Educational Innovations, a pair of wire cutters and some paper clips, (just in case you need to whip up some mass bits of less than a gram) and a nicely formed ice cube. We like to use the aluminum blocks and O-rings from two of the Ice Melting Block sets just to simplify the balancing and have found that having more than one set of the blocks is good for the original activity anyway.

Here we go……. Read the rest of this entry »


Mixing Light Colors with the Three Port Light Source


Marty SagendorfBy: Martin Sagendorf

We see hundreds of colors, but the colors we think we see are often not what we’re actually seeing – i.e. many of these colors are combinations of other colors.  ‘Light’s Story’ is fascinating and full of surprises.  It begins with knowing that radiating and re-radiating substances emit light.  The light colors emitted are functions of a number of factors: the substance, or the incident light, or the temperature of an incandescent source.

All the textbooks explain ‘additive’ and ‘subtractive’ colors.  Explanations are fine, but actual experience makes both an immediate impression and a very lasting learning experience.  For example, here’s how only RED, GREEN, and BLUE light colors combine to produce two new unexpected colors.

Mixing Light - Educational Innovations

But we’re getting ahead of ourselves… let’s start with something we’re really familiar with: pigment colors.  We all know that mixing different paint (pigment) colors will produce new colors.  For example, when we mix red and green pigments we ‘see’ brown. And, as everyone knows, mixing a wide range of pigment colors will produce the ‘color’ we see as black.  But, odd things happen when we mix two light colors.  We don’t get the same color that we obtained when we mixed pigments.

When we mix red and green light colors we don’t ‘see’ brown: we see yellow!  How can this be?  Then… even though it does appear even more counter-intuitive, the mixing of all light colors produces the color we ‘see’ as white (but has NO color? – white… or does it?). Read the rest of this entry »