 by: Tami O’Connor
A few months ago I had occasion to conduct two hands-on workshops for elementary and middle school teachers at the NSTA National Convention in San Francisco on behalf of Educational Innovations. One presentation focused on film canister rockets. This is a tried-and-true way to teach Newtown’s First and Third Laws of Motion and also brings to light concepts such as the four forces of flight; thrust, drag, weight, and lift. It also reinforces instruction on 3-D shapes and 2-D plane figures such as circles, cones, cylinders, rectangles, and triangles.
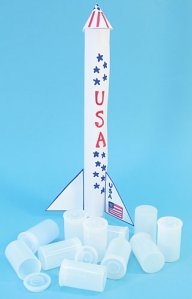 I presented the lesson to the teachers in much the same way I would to my students. The first thing we did was to brainstorm the features all rockets have. After a bit of discussion it was agreed that they all have a nose cone, a cylindrical body, fins, and an engine. I then handed out a paper template imprinted with the pattern of a nose cone and fins, a regular 8½ x 11 sheet of white paper, a piece of goldenrod paper, and a white translucent film canister. Also required are scissors, tape, ¼ piece of an Alka Seltzer tablet, and paper towels.
The only canister that works with this rocket is the type that has the lid that fits snugly inside the canister. The canisters that have a lid that wraps around the outside rim, however, will not allow enough pressure to build up inside the chamber.
How to Make a Rocket
The first step in building a film canister rocket is to construct the body of the rocket. The easiest way is to curl the white 8 ½ x 11 paper into a cylindrical shape using the film canister (without the top) as a guide. The paper can be rolled around the film canister and then taped along the edges. The easiest way to recover the film canister is to blow into one end of the rolled cylinder, forcing the canister out the other end.
 When I conduct this activity I am careful not to offer any suggestion as to whether students should roll the paper in the long or short direction, nor do I discuss how much tape should be used.
The results are very interesting. Students (adults and children) are very creative, especially when they are not bombarded with too much instructional advice.
 At this point, you should use Scotch tape to affix the film canister to the cylinder. This is one of the most critical steps.
First, the canister must have the open end extending far enough from the end of the cylinder so that no tape overlaps the opening of the canister. If any tape extends over the opening, the lid will not form a complete seal, and sufficient pressure to launch the rocket may not build up. Second, if the canister is not taped securely, it will launch into the cylinder and propel only the canister rather than the entire rocket.
The next step is to cut out a nose cone and fins. I use the attached template in my workshops. Click on the image below for a full-sized PDF.
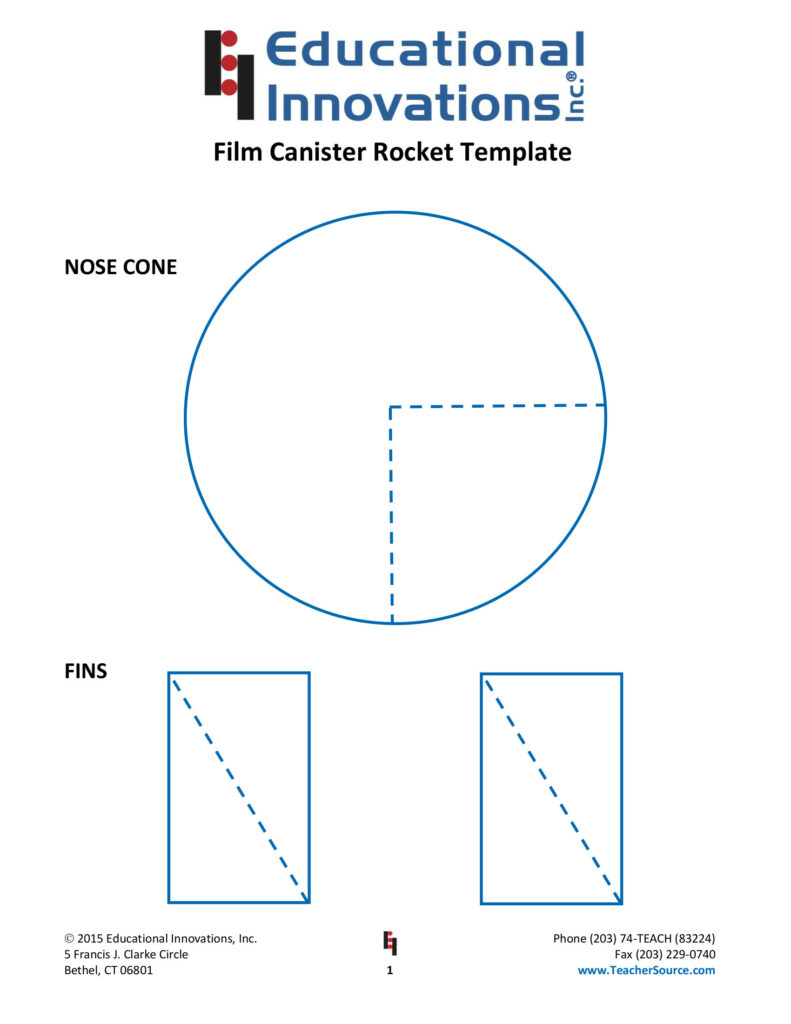
The nose cone is actually a circle with a ¼ pie slice cut out. For those old enough to remember, it closely resembles a Pac Man figure. The nose cone is made by curling the PacMan so the edges of the missing pie piece begin to overlap forming a cone shape. Though the template I passed out had cut lines for the nose cone and fins, I give very little direction as to the size of the nose cone or the total number of fins each student should use.
When the construction of the rocket is finally completed, it’s time for the launch! I have students lay the piece of goldenrod paper on their desk and clear from the launch area any papers or other things that might get wet. I invite students one at a time to the front of the room so everyone can see the results of their construction techniques. During teacher workshops where time is limited, I have everyone launch at the same time.
When we’re ready to launch I hand out approximately ¼ piece of an Alka Seltzer tablet. It is important when working with students to remind them not to put anything in their mouths (especially Alka Seltzer!). Since the Alka Seltzer is the last step in the process I have students place the tablet piece on the desk and leave it there until I specifically tell them to pick it up!
While holding the rocket upside down students are instructed to fill an eyedropper or pipette with water and add a squirt or two into the film canister. The amount of water is not critical in the grand scheme of things.
 The next step is far more critical, so it is important that students are paying attention at this point. Once the Alka Seltzer is added to the water in the film canister, it will begin to fizz and give off Carbon Dioxide gas. The total release of gas is not immediate and therefore will continue for more than a minute which allows plenty of time for the student to secure the cap onto the film canister. If students become flustered and attempt to jam the top onto their canister while holding the paper cylinder portion of their rocket rather than holding the canister portion they will likely damage their rocket. Thirty seconds is much longer than most people think. Having the students relax is the key! The important thing to remember is to grip the rocket around the film canister and NOT the paper cylinder.
 Once the top of the canister is secure the rocket should be placed in the center of the goldenrod paper and the student should step back and wait. The results are wonderful!!! Inside the closed film canister pressure continues to build until the container can no longer contain it. At this point, the top separates from the canister. Since the top is unable to move with the table behind it, the rocket is propelled upward with a loud popping noise. Since Goldenrod paper is an indicator for bases, students will notice the launch pattern that is left behind on their launch pad! Kids find this almost as cool as the rocket launch!
After the activity is over students will note with interest which rockets flew the highest. This is when the true lesson begins! Here is the opportunity to identify the many variables and the effects of each variable on the rockets’ flight characteristics. Examples will include the width of the nose cone, the length of the cylinder, whether any excess paper from the cylinder was trimmed and discarded, and the amount of tape that was added to the rocket during construction.
 Since the film canisters are reusable, and the construction materials are quite inexpensive, students should be given the opportunity to redesign their rockets based on discoveries they made during the launch trials and the class discussion. This is one activity that generates so much enthusiasm with every age group that I fit it in whenever possible. I’ve taught Girl Scouts of varied ages, Daisies to Cadettes, how to make a rocket. And with 16 years of teaching experience from 1st grade to 7th, I managed a successful launch in each and every class! This activity is so adaptable that there is certainly no shortage of learning!
Hi… was trying to download the rocket template but the link doesnt seem to work. Is it possible to fix this up or email to me please? Thanks heaps…. Trev
Hi Trevor,
I will work on fixing this on the site, but if you email me, I will send you the PDF of the template. Tami@teachersource.com
Tami
Educational Innovations
A very wonderful learning activity for pupils!