 by Tami O’Connor
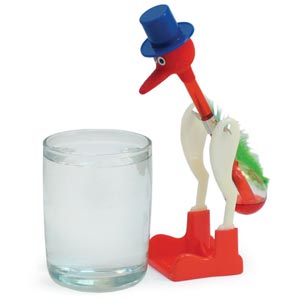
Invented in 1945 by Miles Sullivan, the “drinking bird” has been a favorite of science teachers in every classroom from kindergarten through college. This amazing device is made of two glass bulbs (one representing the head and the other representing the body) joined by a glass tube (representing the neck). Between the two bulbs, attached to the glass tube, is a metal fulcrum upon which the bird pivots. The air has been removed from this closed device, and the bottom ball is filled with a colored liquid that has a high vapor pressure (methylene chloride). The rest of the bird’s body and head is filled with the vapor form of methylene chloride.
The demonstration is set up such that a glass, filled to the top with water, is placed in front of the drinking bird. The glass  should be the same height as the pivot point of the bird. The bird’s head should be moistened and then the bird should be given a gentle push to begin it oscillating along the pivot point. Eventually, the bird appears to drink repeatedly, on its own. So, how does that happen??
The top bulb (head) of the drinking bird is covered with felt. After the felt is moistened with water and the water begins to evaporate, the temperature in the head decreases. This drop in temperature causes some of the vapor inside the head to condense, causing the pressure inside the birds head to decrease. The decrease in pressure in the top bulb causes the liquid from the bottom to be forced upward from the base. As the liquid flows into the top bulb, the bird’s center of gravity moves upward causing the bird to tip forward, dipping its beak into the glass of water.
After the bird tips over and is horizontal, the bottom portion of the glass tube is no longer in the liquid. The glass tube, now 90 degrees to the surface allows the vapor from the bottom to travel to the top until the pressure is equalized. At the same time, liquid in the column flows back to the bottom bulb. The weight of the bird is now primarily below the pivot point, so the bird returns to a vertical position.
The liquid in the bottom bulb is now exposed to the temperature of the ambient air, which is slightly higher than that of the bird’s head. This cycle continues as long as there is enough water in the glass to moisten the felt on the bird’s head. This cycle gives the appearance of a bird drinking!
Suggested Classroom Activities with Drinking Bird
I) Classroom Discussion
Q. Is this an example of perpetual motion?
A. No. The cycle repeats itself only as long as the water evaporates from the head
Q. What is needed in order for the Drinking Bird to work?
A. A difference in temperature between the head and body.
II) Student Challenges
- Observe the operation of the Drinking Bird and explain how it works.
- Discover a way to make the Drinking Bird cycle faster.
- Predict what will happen if a fan blows air toward the Drinking Bird. Does it make a difference which direction the air blows?
- Predict the result of using warmer or cooler water in the glass.
- How long will the bird cycle without needing a refill of the water in the open container? Can you find a way of causing the bird to cycle longer?
- Is there a difference in the cycle rate on a humid day vs. a dry day? Can the bird be used to determine the relative humidity in the air?
- Predict the result of placing a small inverted aquarium over the bird. Does this cause the bird to cycle more or less? (Note: as soon as the water in this closed system reaches its vapor pressure, water from the felt can no longer evaporate and the bird stops.)
- Can you attach a thread to the bird so that it does useful work, e.g. lifting a small paper clip?
You know, there has to be SOME difference, or else everything would be the same including thermal energy. The obvious difference to pick upon is temperature, if the amount of water is the same.